Binary Ninja is built to be as extensible as possible and that includes adding and extending new architectures. While we’ve published example architectures before, this blog post is meant to serve as a more detailed introduction to what goes into adding an architecture. Specifically, this series of blog posts will get you started from zero plugin writing experience to a fully functional architecture with easy to verify checkpoints along the way in a short amount of time.
This first post in the series is meant to get you going with a very fast architecture disassembler in an afternoon by leveraging an existing disassembler and wrapping it into the appropriate APIs. In the second part of the series, I’ll introduce more of the concepts behind Binary Ninja’s IL and how that forms the basis for its advanced analysis.
[EDITOR’S NOTE: This post was lost in the shuffle during some website maintenance and is being re-posted in a corrected form. Sorry about that!]
My First Plugin
First, let’s verify we can get a very simple plugin running. Create a hello.py in your plugin directory (you can also quickly open that folder using the Tools menu in Binary Ninja itself):
print('Hello, world!')
Yes, that’s it. Observe that “Hello, world!” shows up in your log window after running Binja. There are more official guidelines, and a sample plugin, but this is all that’s needed.
Now let’s test some real APIs:
from binaryninja.log import log_info
log_info("Hello, world!")
From this point on, your code can declare to Binja that it’s a PluginCommand, a BinaryView, or even a new Architecture entirely.
Adding an Architecture
We’re working with Architectures, so let’s pick a reasonably small one for demonstration purposes: Z80. Let’s tell Binja that we’re an architecture by extending the Architecture class:
from binaryninja.architecture import Architecture
class Z80(Architecture):
	name = 'Z80'
Z80.register()
Re-launch Binja and using the python console:
>>> list(binaryninja.Architecture)
[<arch: aarch64>, <arch: armv7>, <arch: thumb2>, <arch: armv7eb>, <arch: thumb2eb>, <arch: mipsel32>, <arch: mips32>, <arch: ppc>, <arch: ppc_le>, <arch: x86_16>, <arch: x86>, <arch: x86_64>, <arch: Z80>]
Or, in the Binja UI, create a new buffer File -> New -> Binary Data and a function via the right-click menu, and you should see:
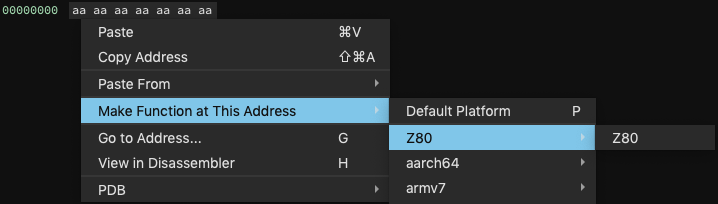
Checkpoint #1
We have a custom architecture with the name ‘Z80’. Hopefully that was quick! See checkpoint #1 for the code so far (note that we’re linking to specific revisions in a GitHub module for each checkpoint, but you can always cheat and checkout the final form as well).
Along with the architecture name, there are other facts about our architecture we can communicate to Binja by setting variables:
class Z80(Architecture):
	name = 'Z80'
	address_size = 2		# 16-bit addresses
	default_int_size = 1	# 1-byte integers
	instr_alignment = 1		# no instruction alignment
	max_instr_length = 3	# maximum length
	# ...
Registers are a tad more involved. We define a dictionary whose keys are the register names and whose values are RegisterInfo objects.
Registers that are independent and not a sub-register of another are called “full width” registers. Otherwise, registers are a subset of the bits from a full width register like eax within rax in x86-64.
The RegisterInfo constructor takes the full width register name, the size of the register, and optionally the offset within an enclosing register. For Z80’s full width, 2-byte register AF the construction is:
class Z80(Architecture):
	#...
	regs = {
		'AF': RegisterInfo('AF', 2)
	}
This says “Register AF is a sub-register of AF and has size 2.” Since the sub-register relationship points to itself, Binja knows it’s a full-width register. In contrast, consider the 1-byte registers A and Flags which are sub-registers of AF:
	regs = {
		'AF': RegisterInfo('AF', 2),
		'A': RegisterInfo('AF', 1, 1),  	# sub-register of 'AF', 1-byte, offset 1
		'Flags': RegisterInfo('AF', 0),		# sub-register of 'AF', 1-byte, offset 0
	}
This says, “Register A is a sub-register of AF, has size 1, and is at byte offset 1 from the LSB of AF and register Flags is a sub-register of AF, has size 1, and is at byte offset 0 from the LSB of AF.”
If there are any registers with the role of stack pointer or link register, we should set them. The former applies to Z80:
stack_pointer = "SP"
Checkpoint #2
Our Z80 architecture reported its address size, integer size, instruction size, and available registers to Binja! See checkpoint #2 for the code so far.
Setting variables is good for architecture information that doesn’t change or has few possible values, but once we want to disassemble, we need to implement callback functions.
Though many callback functions are available for your architecture to service, only three are required:
get_instruction_info()- to help Binja draw the control-flow graphget_instruction_text()- to disassemble bytes for Binjaget_instruction_low_level_il()- to lift, but we’ll just return NOPs for now
The first, get_instruction_info(), describes instructions’ length and branch behavior by returning an InstructionInfo:
	def get_instruction_info(self, data, addr):
		result = InstructionInfo()
		result.length = 1
		return result
The second, get_instruction_text(), describes the actual text presented to the user per instruction, by returning a list of InstructionTextToken and the instruction size:
	def get_instruction_text(self, data, addr):
		tokens = [InstructionTextToken(InstructionTextTokenType.TextToken, "HELLO!")]
		return tokens, 1
We’ve told Binja that all bytes disassemble to “HELLO!” and have length 1. Let’s test it in the python console:
>>> Architecture['Z80'].get_instruction_text(b'\xAA', 0)
(['HELLO!'], 1)
Or in the GUI by creating a buffer and a function with architecture Z80:
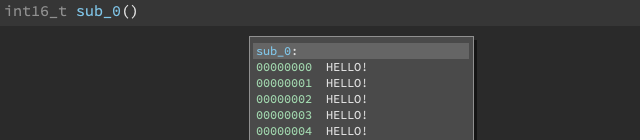
Checkpoint #3
Our Z80 architecture can now disassemble, though it only returns placeholder text for all instructions. See checkpoint #3 for the code so far.
But now we need to get some real disassembly. To short-circuit the process, let’s try finding an existing disassembler and piggyback on its results! After pip install skoolkit, I learned it expected memory snapshots of a ZX spectrum game. No problem: our requests can be wrapped to look like that. In skwrapper.py (skoolkit wrapper) I exposed the very simple disasm(data, addr) function for our architecture to use.
First, we need get_instruction_info() to return the correct size:
	def get_instruction_info(self, data, addr):
		(instrTxt, instrLen) = skwrapper.disasm(data, addr)
		if instrLen == 0:
			return None
		result = InstructionInfo()
		result.length = instrLen
		return result
Next, we need get_instruction_text() to return the correct string:
	def perform_get_instruction_text(self, data, addr):
		(instrTxt, instrLen) = skwrapper.disasm(data, addr)
		tokens = [InstructionTextToken(InstructionTextTokenType.TextToken, instrTxt)]
		return tokens, instrLen
And we can test it with:
>>> binaryninja.Architecture['Z80'].get_instruction_text(b'\x2a\x34\xbc\x1a', 0)
(['LD HL,($C234)'], 3)
Checkpoint #4
We got a disassembler for free from PIP. Now actual Z80 assembly is being returned. See checkpoint #4 for the architecture code, and drop in skwrapper.py alongside in the plugins directory so it can disassemble.
If the disassembly text were broken into types, Binja could do some cool tricks. All registers could be highlighted when clicked. Addresses could be followed when double clicked. Here’s how we would split the LD HL,($C234):
| token | type |
|---|---|
| “LD” | InstructionToken: The instruction mnemonic |
| “HL” | RegisterToken: Registers |
| ”,” | OperandSeparatorToken: The comma or whatever else separates tokens |
| ”(“ | BeginMemoryOperandToken |
| ”$” | TextToken: Text that doesn’t fit into the other tokens |
| “C234” | PossibleAddressToken: Integers that are likely addresses |
| ”)” | EndMemoryOperandToken: The end of a memory operand |
What we’ll do is parse the string into one of several classes of formats. By looking at premade opcode lists or disassembling every instruction ourselves, we can see that there aren’t that many patterns. We can do a decent job splitting on just a few symbols:
atoms = [t for t in re.split(r'([, ()\+])', instrTxt) if t]
The first atom is an InstructionToken type and we add a space if there are operands:
result.append(InstructionTextToken(InstructionTextTokenType.InstructionToken, atoms[0]))
if atoms[1:]:
  result.append(InstructionTextToken(InstructionTextTokenType.TextToken, ' '))
The remaining atoms are operands and are handled on a case-by-case basis. Don’t let the long class and enumeration names intimidate you, this is very manageable at just over 10 cases!
for atom in atoms[1:]:
	if not atom or atom == ' ':
		continue
	elif atom == 'C' and atoms[0] in ['CALL','RET']:
		result.append(InstructionTextToken(InstructionTextTokenType.TextToken, atom))
	elif atom in self.reg16_strs or atom in self.reg8_strs:
		result.append(InstructionTextToken(InstructionTextTokenType.RegisterToken, atom))
	elif atom in self.cond_strs:
		result.append(InstructionTextToken(InstructionTextTokenType.TextToken, atom))
	elif atom.startswith == '#':
		result.append(InstructionTextToken(InstructionTextTokenType.IntegerToken, atom))
	elif atom.startswith('$'):
		result.append(InstructionTextToken(InstructionTextTokenType.PossibleAddressToken, atom))
	elif atom.isdigit():
		result.append(InstructionTextToken(InstructionTextTokenType.IntegerToken, atom))
	elif atom == '(':
		result.append(InstructionTextToken(InstructionTextTokenType.BeginMemoryOperandToken, atom))
	elif atom == ')':
		result.append(InstructionTextToken(InstructionTextTokenType.EndMemoryOperandToken, atom))
	elif atom == '+':
		result.append(InstructionTextToken(InstructionTextTokenType.TextToken, atom))
	elif atom == ',':
		result.append(InstructionTextToken(InstructionTextTokenType.OperandSeparatorToken, atom))
	else:
		raise Exception('unfamiliar token: %s from instruction %s' % (tok, instrTxt))
Our console test now shows all the tokens we returned:
>>> binaryninja.Architecture['Z80'].get_instruction_text('\x2a\x34\xbc\x1a', 0)
(['LD', ' ', 'HL', ',', '(', '$C234', ')'], 3)
And in the UI, we have:
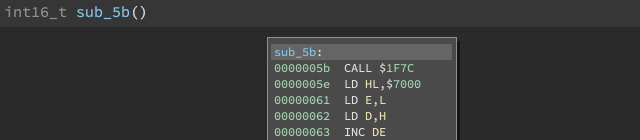
Checkpoint #5
Our Z80 architecture can now disassemble instructions for real. Parsing strings is inefficient, but we’re OK sacrificing runtime speed for development speed for now. Write now, learn now, optimize later. See checkpoint #5.
In Binja, you’ll see that all instructions are disassembled and presented sequentially. It’s all in one block.
To make Binja split blocks properly and find new code to disassemble, we must augment get_instruction_info() with the ability to attach branch information to the returned InstructionInfo:
| what | purpose |
|---|---|
| UnconditionalBranch | terminates a basic block |
| FunctionReturn | terminates a function |
| TrueBranch, FalseBranch | splits the control flow graph into two |
| CallDestination | informs Binja of where to recursively look to disassemble more code |
We are simply helping Binja draw the CFG and locate more code to disassemble. We are not telling Binja the meaning of the instructions; that’s saved for lifting.
After some quick searches on Z80 branching, these are the cases I found, as regular expressions:
		rccs = r'(?:C|NC|Z|NZ|M|P|PE|PO)'
		regexes = [ \
			r'^(?:JP|JR) '+rccs+r',\$(.*)$',	# 0: conditional jump		eg: JP PE,#DEAD
			r'^(?:JP|JR) \$(.*)$',				# 1: unconditional jump		eg: JP #DEAD
			r'^(?:JP|JR) \((?:HL|IX|IY)\)$',	# 2: unconditional indirect	eg: JP (IX)
			r'^DJNZ \$(.*)$',					# 3: dec, jump if not zero	eg: DJNZ #DEAD
			r'^CALL '+rccs+r',\$(.*)$',			# 4: conditional call		eg: CALL PE,#DEAD
			r'^CALL \$(.*)$',					# 5: unconditional call		eg: CALL #DEAD
			r'^RET '+rccs+'$',					# 6: conditional return
			r'^(?:RET|RETN|RETI)$',				# 7: return, return (nmi), return (interrupt)
		]
All regular expressions are tested against the string returned from disassembly. Depending on which one applies, we add_branch() the appropriate BranchType:
			if i==0 or i==3:
				dest = int(m.group(1), 16)
				result.add_branch(BranchType.TrueBranch, dest)
				result.add_branch(BranchType.FalseBranch, addr + instrLen)
				pass
			elif i==1:
				dest = int(m.group(1), 16)
				result.add_branch(BranchType.UnconditionalBranch, dest)
				pass
			elif i==2:
				dest = int(m.group(1), 16)
				result.add_branch(BranchType.IndirectBranch)
				pass
			elif i==4 or i==5:
				dest = int(m.group(1), 16)
				result.add_branch(BranchType.CallDestination, dest)
				pass
			elif i==6:
				pass # conditional returns don't end block
			elif i==7:
				result.add_branch(BranchType.FunctionReturn)
In the Binja UI you should see:
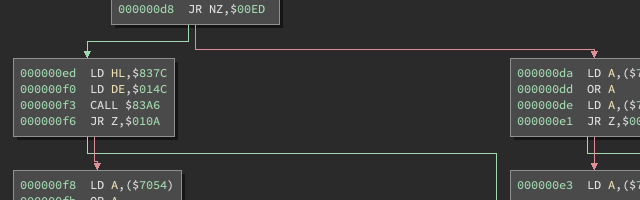
Checkpoint #6
We now have beautiful control flow graphs from Binja because of the help we returned from the newly enhanced get_instruction_info(). See checkpoint #6.
How do we get Binja to use our architecture when a Z80 file is opened? By implementing a BinaryView for each file type. As an example, let’s create one for ColecoVision ROMs:
from binaryninja.binaryview import BinaryView;
class ColView(BinaryView):
	name = 'Coleco'
	long_name = 'ColecoVision ROM'
ColView.register()
When opening a new binary, Binja visits all registered views and asks if that view applies by calling its [is_valid_for_data()](https://api.binary.ninja/binaryninja.binaryview-module.html#binaryninja.binaryview.BinaryViewType.is_valid_for_data) function. Check my ColicoVision notes to see that they start with “\xAA\x55” or “\x55\xAA”:
	@classmethod
	def is_valid_for_data(self, data):
		header = data.read(0,0x24)
		return header[0:2] in [b"\xAA\x55", b"\x55\xAA"];
Two other functions: perform_is_executable() and perform_get_entry_point() do the roles indicated by their names:
	def perform_is_executable(self):
		return True

	def perform_get_entry_point(self):
		return unpack('<H', self.data[0xA:0xA+2])[0]
The BinaryView can also place parts of the file in memory. From the ColicoVision notes, we know ROMs are mapped to 0x8000. Using add_auto_segment() we place it in one call:
self.add_auto_segment(0x8000, 0x4000, 0, 0x4000, SegmentFlag.SegmentReadable|SegmentFlag.SegmentExecutable)
Checkpoint #7
Now we can open up ColecoVision ROMS in Binja and our Z80 architecture is loaded and used automatically. Test it out on some Homebrew ROMs.
We’re up to three separate files now. It’s time to graduate to a python module directory structure in the plugins folder:
- Z80/Z80Arch.py
- Z80/ColecoView.py
- Z80/skwrapper.py
- Z80/__init__.py
See checkpoint #7.
[Note: due to changes in newer versions of Binary Ninja, code in checkpoint #7 no longer works.
To fix it, in the __init__.py,
change from Z80Arch import Z80 to from .Z80Arch import Z80, and from ColecoView import ColecoView to from .ColecoView import ColecoView.]
Recap
The article’s goal was to get you running as fast as possible, but at the cost of both explanatory details and execution speed.
Writing architectures will feel more natural if you understand what Binja is trying to do. It’s trying to have a concise interface by which any new architecture can be described, allowing Binja to present disassembly and perform analysis:
| objects to be described | described by |
|---|---|
| registers, flags, address size, etc. | member variables in the architecture class |
| instruction size, branch behavior | get_instruction_info() method |
| instruction string | get_instruction_text() method |
| instruction semantics | get_instruction_low_level_il() method |
When Binja is faced with a buffer of bytes and an associated architecture, its first use of its senses is to call get_instruction_info() and see instruction size and whether branching is present. It caches the results, and divides the buffer into basic blocks. Now the instruction sized bytes within each block can be sent to get_instruction_text() to display text per instruction within a block.
It’s very important to understand the distinction between the “realms” get_instruction_info() and get_instruction_text() live in versus what get_instruction_low_level_il() lives in. The former just help guide Binja through finding the presenting instructions to users. The latter enables Binja to analyze code by translating the meaning and behavior of the instructions into Binja’s native language: BNIL.
Architectures can be invoked via the command line, or explicitly selected when creating a function. But they’re very convenient when attached to binary file types. That’s when a BinaryView comes into play. We implemented a BinaryView for ColecoVision ROMs, but we might also want a BinaryView for TI-calculator ROMs or Gameboy ROMs.
Conclusion
I hope this article convinced you that architecture writing doesn’t have to be a slog. Part 2 will cover lifting, which will enable Binja to perform its various analyses on code from your architecture.
Don’t be afraid to use any of the checkpoint codes as starting points for your own work. There’s a PowerPC architecture that outsources disassembly to capstone and an NES architecture that’s totally self contained.
If you have any questions, hop on the #api-help channel in our community slack.