In this blog post, I will explain how I reverse engineered a Cobalt Strike dropper and obtained its payload. The payload is a custom executable file format based on DLL. The dropper decrypts, loads, and executes the payload. Initially, I thought this must not be a PE executable at all, but I gradually realized it was. Much of the effort was spent on fixing the file so it could be loaded by Binary Ninja for further analysis.
First Impressions
A friend of mine shared with me this sample. It is an x86 PE binary that is 284kB in size. After loading it into Binary Ninja, I saw it was not packed or encrypted by any well-known packer or protector. However, there were only dozens of functions recognized, which is quite a small number relative to its size. This suggested the sample was packed by a custom packer/encryptor.
As is routine for malware analysis, I started by executing the sample in an online sandbox. In this case, I used Triage. The sample executed fine in the sandbox and was recognized as cobaltstrike.
Then, I uploaded the sample to UnpacMe to see if it could be unpacked automatically. UnpacMe also processed the sample and recognized it as Cobalt Strike, but the unpacked artifact did not make any sense.
At this point, I realized I wasn’t going to get much further without analyzing the sample with Binary Ninja to see how it worked.
Thread and Pipe
The sample seemed to be compiler-generated and not obfuscated, so I decided to mainly analyze the sample in HLIL. Viewing code in HLIL can often speed up analysis. However, for handwritten or obfuscated code, I prefer to look at the disassembly, which offers a closer view of what is happening. Binary Ninja now supports split views, so we can conveniently view HLIL and disassembly side-by-side:
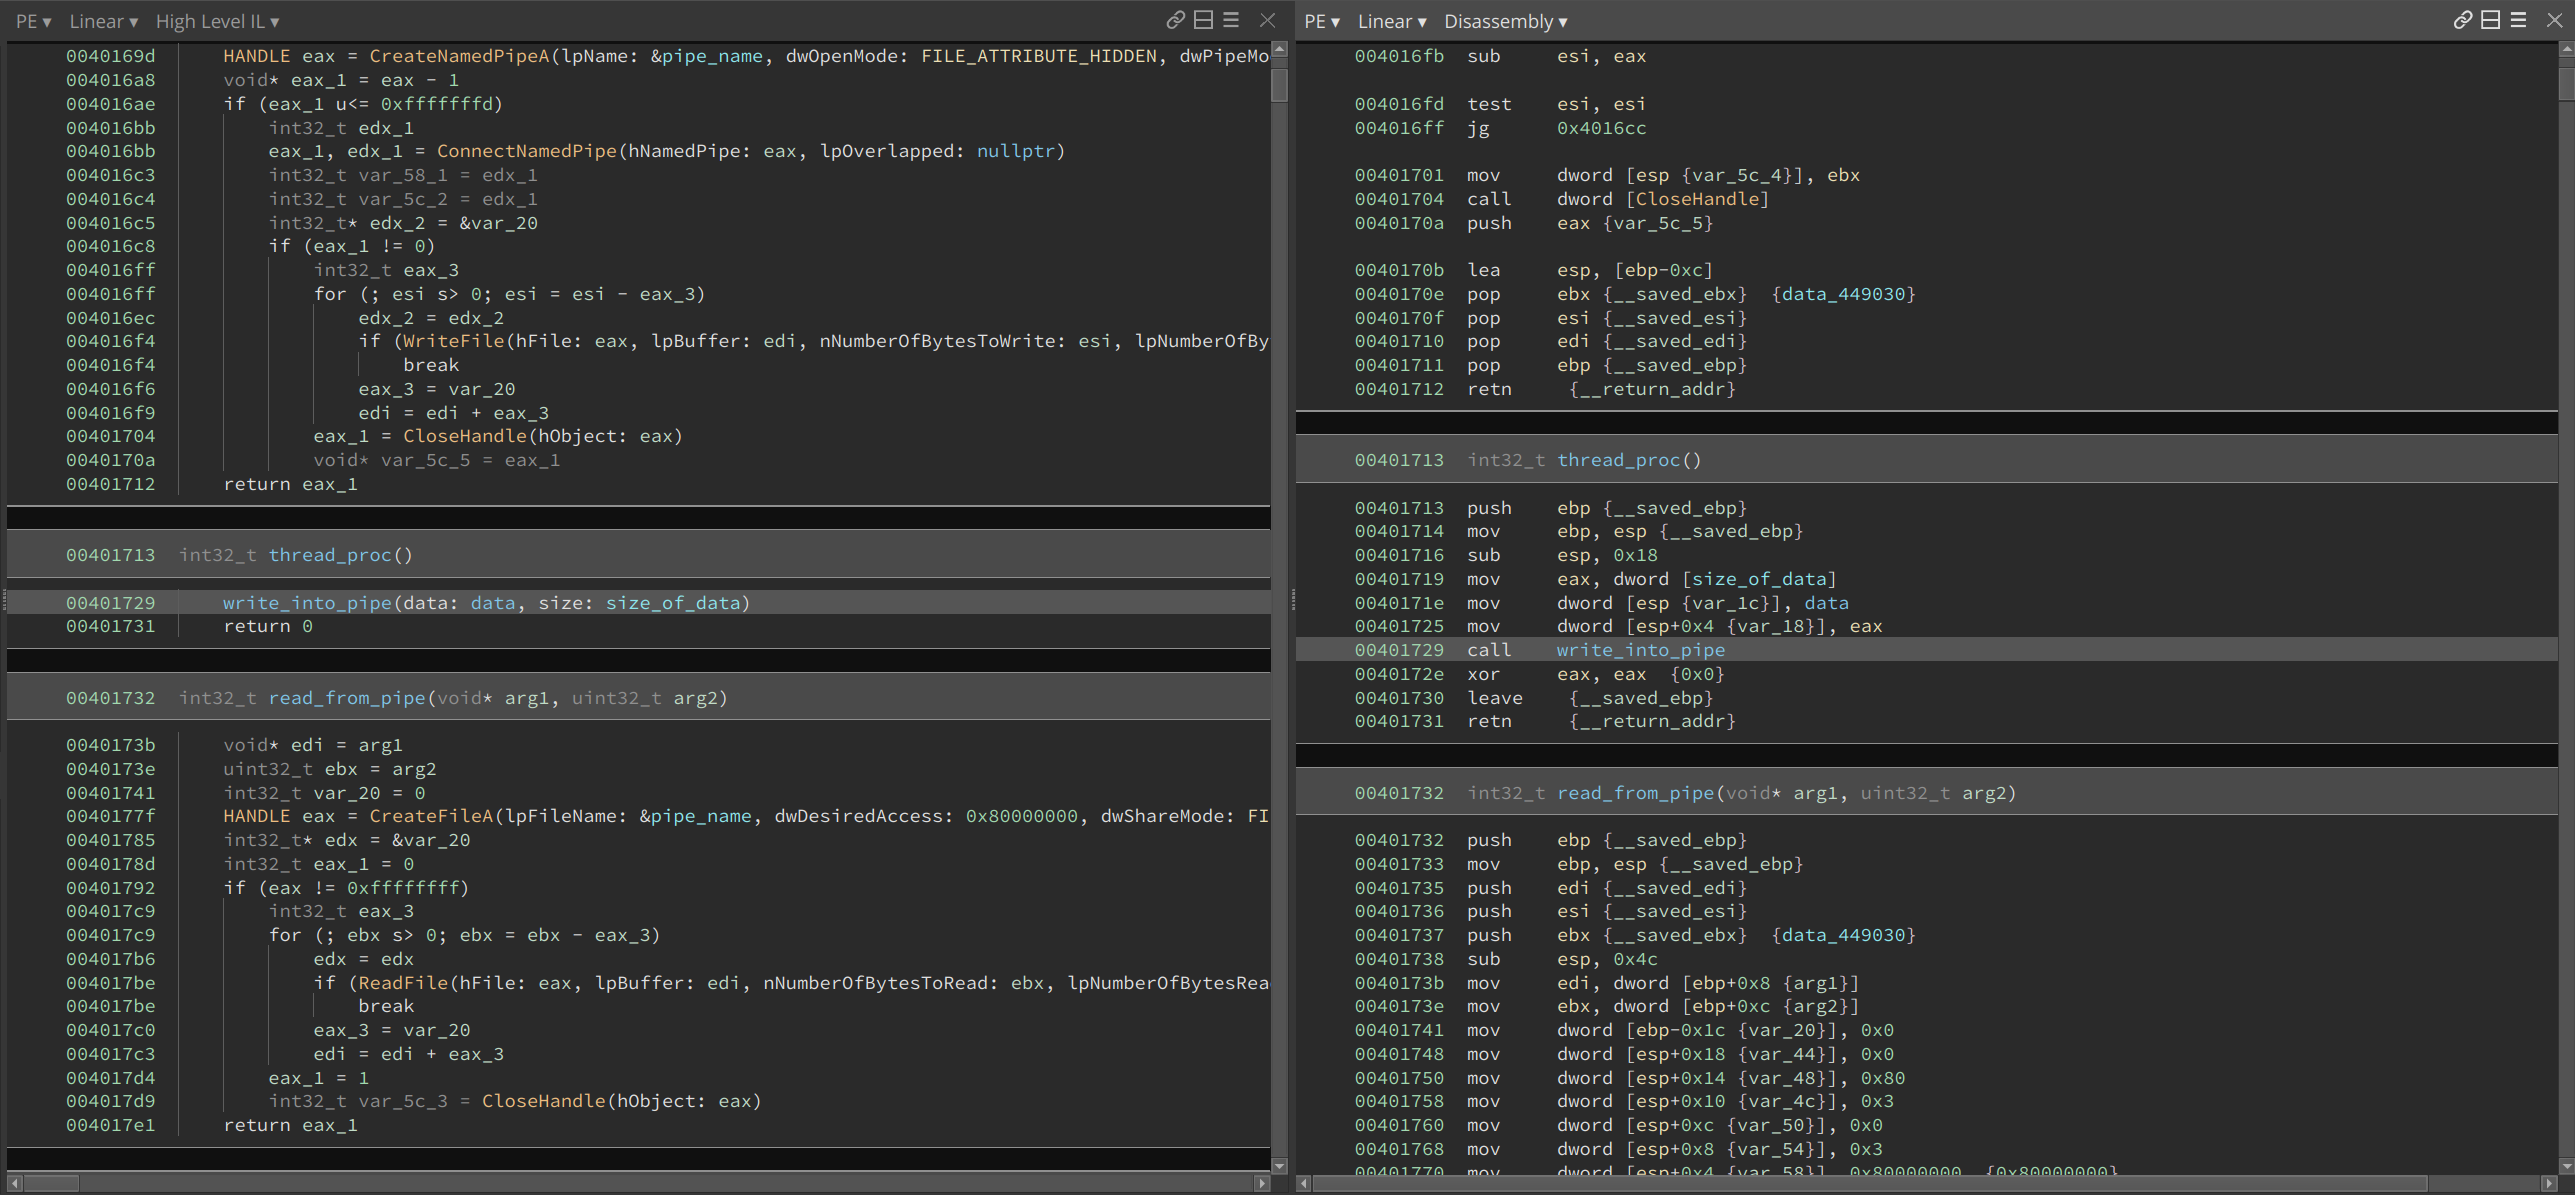
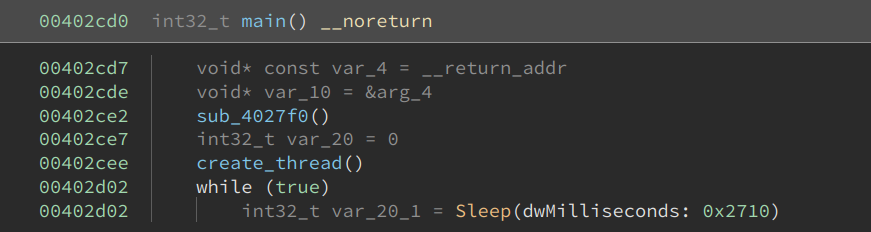
The main function is rather short. The first function call is part of the runtime and it is doing some initialization which we can ignore. The next function creates a new thread within it which we will analyze later. Then it enters into a loop that calls Sleep(10000) indefinitely.
As a note, the sample is stripped so it does not contain any function or variable names in it (except the Windows API imports). All names in the following screenshots were recovered or created during reverse engineering.
The create_thread function is also not complex. It formats a string using values derived from GetTickCount, probably to make it random and avoid conflict. This string is later used as a name for a pipe. Then it creates a new thread by calling CreateThread.

The thread_proc pushes two arguments onto the stack, and then calls write_into_pipe.

The write_into_pipe creates a named pipe using the randomized string, connects to it, and writes the buffer into it.
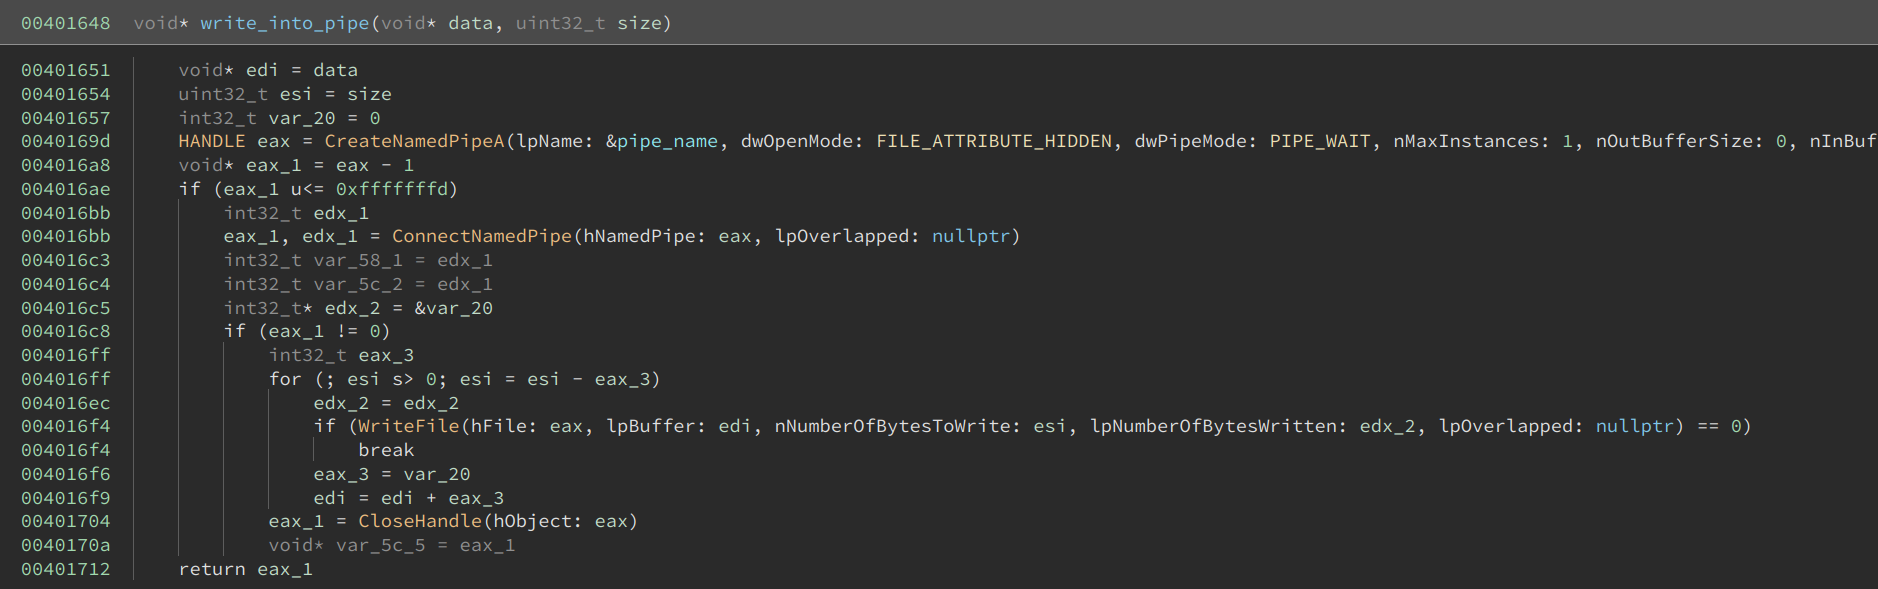
I quickly noticed size_of_data is huge – 0x33400 bytes. Almost the entire sample is made up of this huge buffer. This suggested the buffer was encrypted or compressed, and the dozens of functions that we see merely restore the code to its original content. Typically, at the end of it, execution will be handed to the decrypted/decompressed buffer.
At this point, we are only seeing the data being written into the named pipe. We cannot see how it is being accessed.
Decrypting the Buffer
After browsing the code, I realized that there was a function call at the end of create_thead that I had originally ignored.
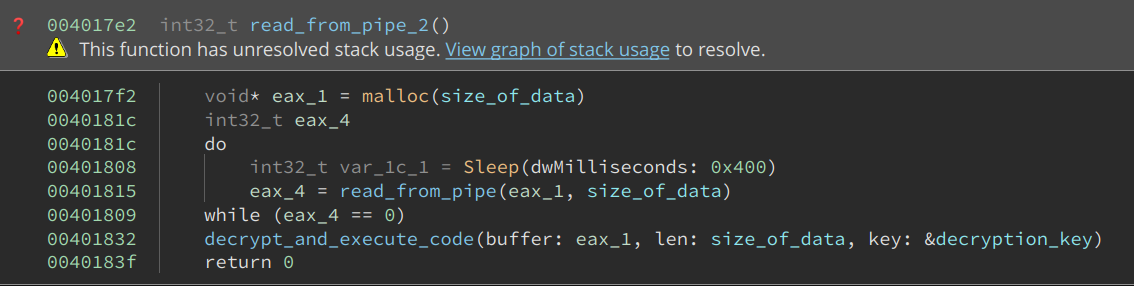
This function first uses malloc to allocate a buffer of the same size as the data written into the named pipe. It then loops and reads the content of the buffer. At the end of it, it decrypts the code and executes it.

The decryption function first calls VirtualAlloc to allocate a buffer and sets its permission to PAGE_READWRITE. Then, it XORs the content with a four-byte hard-coded key. The key is 72432a9c, in this case. Near the end of the function, it sets the permission of the buffer to PAGE_EXECUTE_READ. Finally, it creates another thread, which just jumps to its first argument. The address of the buffer is passed as the first argument. This starts execution from the beginning of the buffer. The code could, of course, have used the address of the buffer as the entry point of the thread. However, that might cause anti-virus software to detect it, so it used this small trick instead to disguise it.
So, in order to analyze the code of the payload, I needed to first decrypt the buffer by XORing with the four-byte key. There are two ways to do this. The first is to select the buffer, right-click, and then click Transform -> XOR. This is not super convenient in this case as the input buffer is huge and selecting it with a precise size is not easy. The second way is to use the Python API, which is what I did:
data = bv.read(0x403014, 0x33400)
xor = Transform['XOR']
output = xor.encode(data, {'key': b'\x72\x43\x2a\x9c'})
bv.write(0x403014, output)
Before I discuss analyzing the code in this buffer, there was a function that I initially did not quite understand. See the name I give it – preparation? I guessed it was doing some final preparation before executing the buffer. The HLIL for the function was also not very easy to read. However, after switching to disassembly and reading the instructions one by one, there came an “A-ha!” moment.
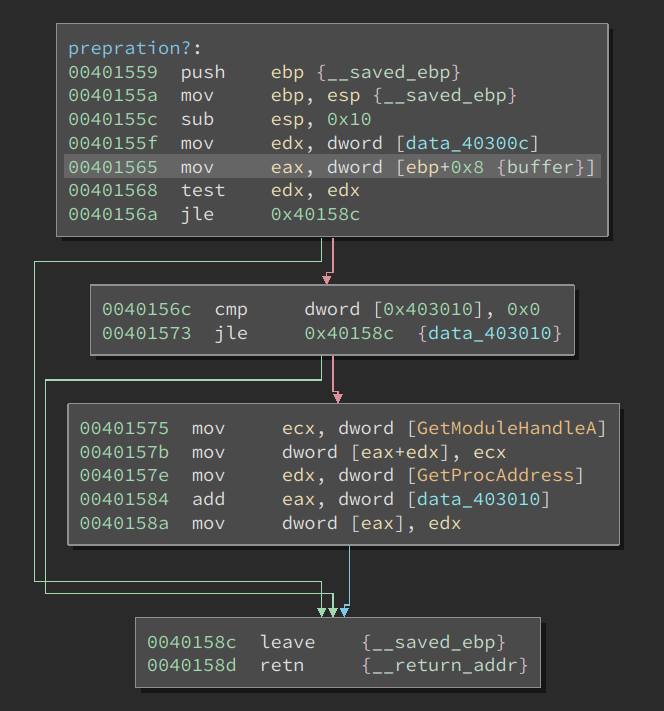
This function first tests whether two signed DWORDs are positive. If both of them are larger than 0, they are treated as offsets into the buffer. The code takes the address of functions GetModuleHandleA and GetProcessAddress and writes their addresses at the given offsets. In other words, it does the following:
*(uint32_t)(buffer + 0x7c71) = GetModuleHandleA;
*(uint32_t)(buffer + 0x7c78) = GetProcessAddress;
Why would the code write the address of these two functions into the middle of the buffer? Well, it is passing the function pointer into the code so that it can be used by it. This is a clever trick because the author does not have to use other (more complex) techniques to obtain these values while maintaining a low footprint in AV’s eye.
Viewing the original content at those offsets confirms my guess:
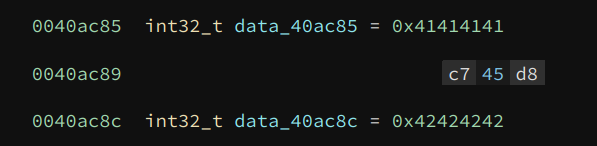
The original value at the two offsets is 0x41414141 and 0x42424242, which are obviously placeholder values. We can fix the values by writing the actual address of the two functions here. This can be done by hand, or using the following Python code:
addr = bv.get_symbols_by_name('GetModuleHandleA')[0].address
bv.write(0x403014 + 0x7c71, struct.pack('<I', addr))

addr = bv.get_symbols_by_name('GetProcAddress')[0].address
bv.write(0x403014 + 0x7c78, struct.pack('<I', addr))
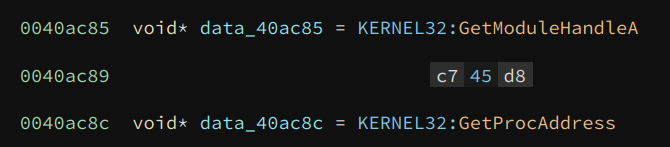
If we redefine their types to void*, we can see the effect:
Alright, with the two values fixed, we are ready to analyze the code in the buffer.
Finding Address of Windows APIs
I noticed the buffer started with PE as soon as it was decrypted. If this were actually a PE binary, we would simply need to dump it and load it with Binary Ninja. However, according to my analysis, this buffer is executed from the beginning. So, I quickly ruled out the possibility of this file being a PE. It must be a trick to confuse the analyst.

Defining a function at the entry point also produces meaningful code:
As we can see, the byte 0x4d5a (PE) corresponds to dec ebp; pop edx and their effects are immediately undone by the following two instructions: push edx; inc ebp. Now, I am even more confident that this is not a PE, and I did not fall into the trap of the developer.
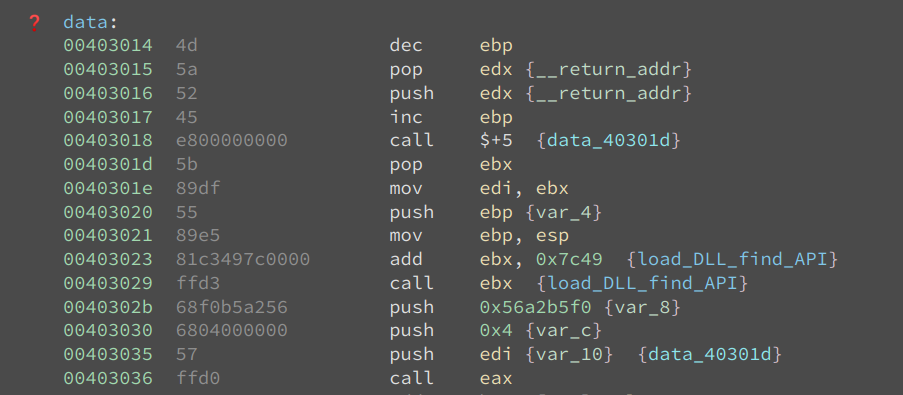
The next few instructions show a common way of getting the value of the eip register and then calculate an address based on it:
00403018  e800000000         call    $+5  {data_40301d}
0040301d  5b                 pop     ebx
......
00403023  81c3497c0000       add     ebx, 0x7c49  {load_DLL_find_API}
00403029  ffd3               call    ebx  {load_DLL_find_API}
Binary Ninja understands this technique, so it calculates and annotates the value of ebx at the call site. This is based on our dataflow analysis.
Moving on to function load_DLL_find_API, we can see the address of GetModuleHandleA and GetProcAddress are loaded into two stack variables, and their current values are checked against the placeholder values, i.e., 0x41414141 and 0x42424242.
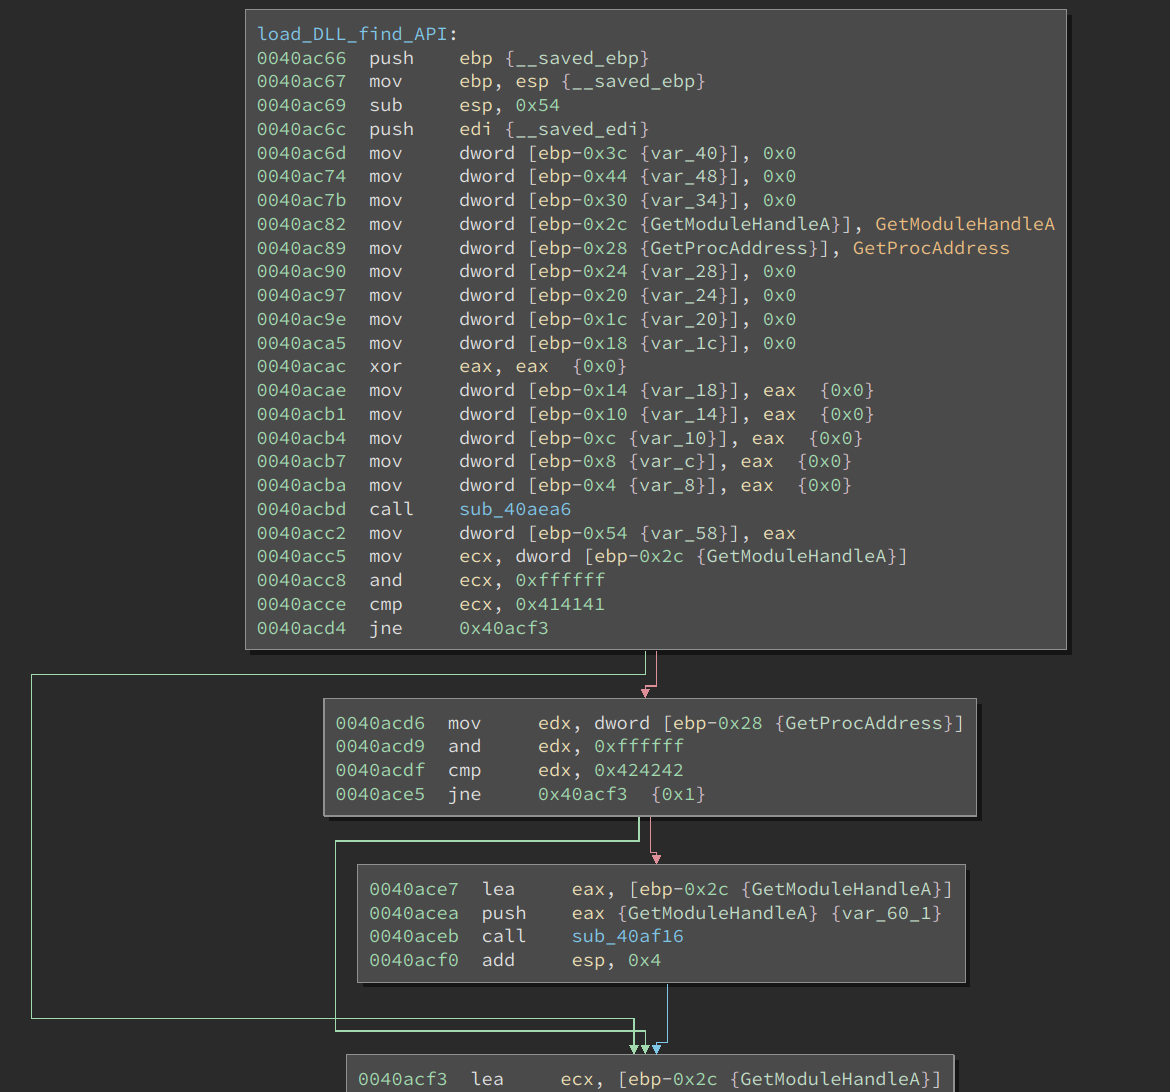
If their current values are different from the placeholder values, the following function is executed:
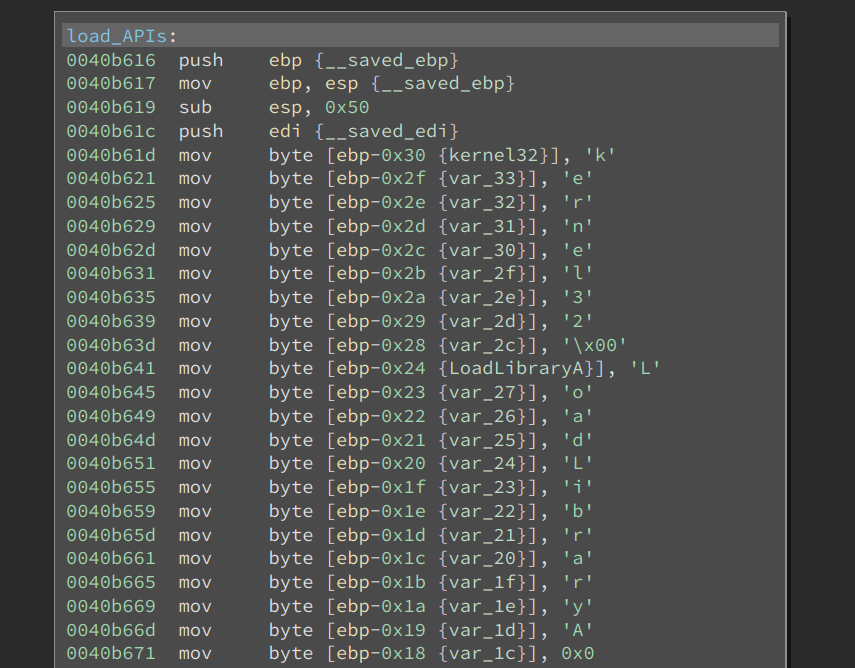
These are all DLL and Windows API names. The function first finds LoadLibraryA, and then loads the needed DLLs. It also gets the addresses of the Windows API by GetProcessAddress. The addresses of these API calls are put into a function pointer array in the following order:
GetModuleHandleA
GetProcAddress
LoadLibraryA
LoadLibraryExA
VirtualAlloc
VirualProtect
An interesting behavior is the code zeros the strings of these API names, as seen below:
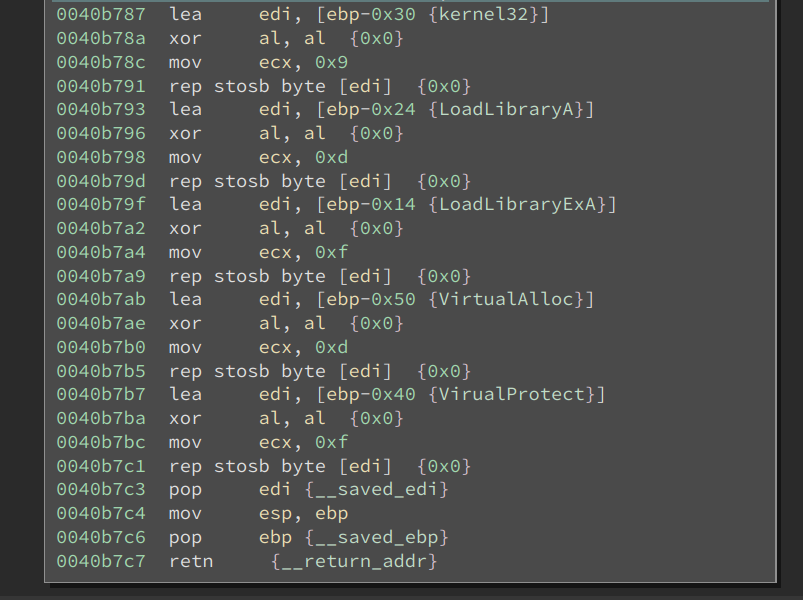
This is another anti-virus evasion technique.
Is this a PE?
Since the code is quite long, I will summarize its behavior. After the above function returns, the sample does the following:
- Allocates a buffer, whose size is read from a particular offset in the buffer
- Reads section information from a section table, allocates a buffer for them, and copies the content of each section into the buffer
- Loads some DLLs specified at certain offsets in the buffer and resolve API names
- Some other things that aren’t important to our analysis
These operations very similar to loading an executable/library. Since I have ruled out this is a PE previously, I think this sample has a custom executable format. If that is the case, then I have to write a Binary View to load it. However, as I read the code more carefully, I started to realize this is a PE, though with some changes:
- The section names are XOR-ed with byte 0xc3
- The DLL names and function names are XOR-ed with 0xc3
- The
.textsection is XOR-ed with byte 0xc3
So, it turns out I have indeed been fooled by the developer: I incorrectly thought it was not a PE, whereas it turns out this is a modified PE format. The good news is I realized this fairly quickly and did not waste any time on writing a unnecessary loader for it.
I dumped the buffer to disk. Next, I needed to fix it so I could load it into Binary Ninja and analyze it.
The section names and .text section were easier to deal with. There are only a few sections, so manually XOR-ing the names was fast enough. I XOR-ed the entire .text section with the Transform API, as shown above.
The next problem was resolving DLL and API names. I tried to dump the file after the names were decrypted. However, it did not work because the sample copied the encrypted names into a buffer and then decrypted them. This buffer was also reused to decrypt different names. So, dumping it did not help me.
I decided to deal with this using Binary Ninja’s Python API.
Fixing the Payload DLL
Let us first revisit the PE file format and see how we can find the addresses of the DLL and function names.
There are 16 PE_Data_Directory_Entry at the end of the PE32_Optional_Header. The import table is the second entry in it. The PE_Data_Directory_Entry contains the RVA (relative virtual address) and size of the table.
Once we calculate the VA (virtual address) of the import table from its RVA, there are multiple Import_Directory_Tables there. The number of entries is not specified – its end is marked by a structure whose values are NULL.
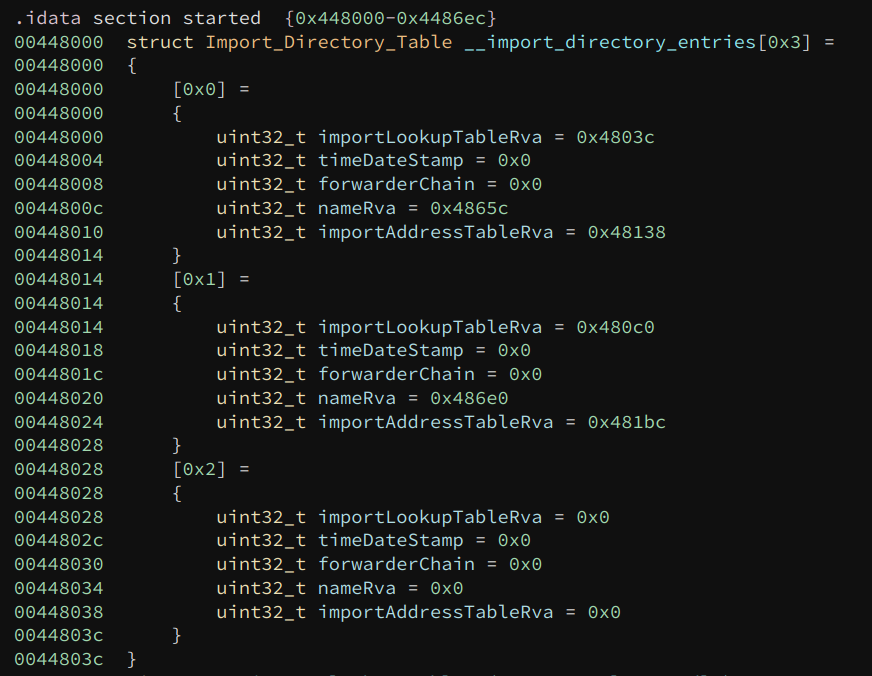
If we view the import table of the sample (the original one, not the one we have dumped), there are two entries in it. Each of these represents a DLL import and multiple function imports. The nameRva field is the RVA of the DLL name, so we can find the DLL names base on this.
The function names are slightly more complex. We need to follow the importLookupTableRva to get the INT (import name table).
This is an array of RVAs, each describing an API function import. Again, the number of entries in this array is not specified – its end is marked by a value of NULL.

If we follow the VA of the first entry, we can see it comes with a two-byte ordinal of the API, followed by its name. This is how we find the names of the API.
Using BinaryReader
The entire processing script I wrote can be accessed here. Below is a walkthrough for it.
We start with the following code to find the VA of the import table:
from binaryninja import BinaryViewType, BinaryReader

bv = BinaryViewType.load('extracted_3.exe')
print(bv.start)

importTableEntry_offset = 0x100

br = BinaryReader(bv)
br.seek(bv.start + importTableEntry_offset)
import_table_va = bv.start + br.read32()
br.seek(import_table_va)
Two things are worth noting. First, many of the offsets in the PE file format are in RVA form, which are offsets from the start of the module. Adding bv.start to it converts the RVA to a VA.
Second, we are using the BinaryReader to read the binary. BinaryReader internally tracks the current offset, so it is very suitable for the case of consecutive reading. Of course, we can simply use bv.read() to do the job, but we would have to track the offset by ourselves, which is more effort (and more error-prone).
Strings in the PE file format are NULL-terminated. We know they are XOR-ed with a magic byte, so we need to look for it as the end of the string:
def read_until_byte(br, offset, byte_val):
    old_offset = br.offset
    br.seek(offset)
    result = b''
    while True:
        c = br.read(1)
        result += c
        if ord(c) == byte_val:
            break

    br.seek(old_offset)
    return result
Recovering the original name is very simple:
def xor(input, byte_val):
    result = ''
    for i in range(len(input)):
        c = chr(input[i] ^ byte_val)
        result += c

    return result
The main code is a loop that processes each DLL:
while True:
    table_rva = br.read32()
    if table_rva == 0:
        break

    br.seek(br.offset + 8)
    name_rva = br.read32()
    # print('name_rva: 0x%x' % name_rva)
    name_va = bv.start + name_rva
    name = read_until_byte(br, name_va, 0xc3)
    restored_name = xor(name, 0xc3)
    print(restored_name)
    bv.write(name_va, restored_name)

    table_va = bv.start + table_rva
    # print("table_va", hex(table_va))
    process_table(br, bv.start, table_va)

    br.seek(br.offset + 4)
The code to process each table (DLL) is also a loop:
def process_table(br, start, offset):
    old_offset = br.offset
    br.seek(offset)

    while True:
        int_rva = br.read32()
        if (int_rva == 0):
            break
        if (int_rva & 0x80000000 != 0):
            continue
        else:
            int_va = start + int_rva
            # print('int_va', hex(int_va))
            process_one_entry(br, start, int_va)

    br.seek(old_offset)
Note that if the INT RVA has its highest bit set, then this API is not imported by name. Instead, it is imported by ordinal. In that case, we should skip it.
Finally, we get to process an individual API name:
def process_one_entry(br, start, address):
    old_offset = br.offset
    br.seek(address)
    br.read16()

    # print('br.offset', hex(br.offset))
    name = read_until_byte(br, br.offset, 0xc3)
    restored_name = xor(name, 0xc3)
    print(restored_name)
    bv.write(address + 2, restored_name)

    br.seek(old_offset)
Once we are done processing, we can export the DLL to disk:
bv.save('extracted.dll')
The DLL can be downloaded from here.
This sample has another trick to slow down the analyst: Its entry point offset is not read from the PE32_Optional_Header.addressOfEntryPoint (offset 0x28). Instead, it is read from the PE32_Optional_Header.loaderFlags (offset 0x70). To fix this, we simply change the value of addressOfEntryPoint accordingly.
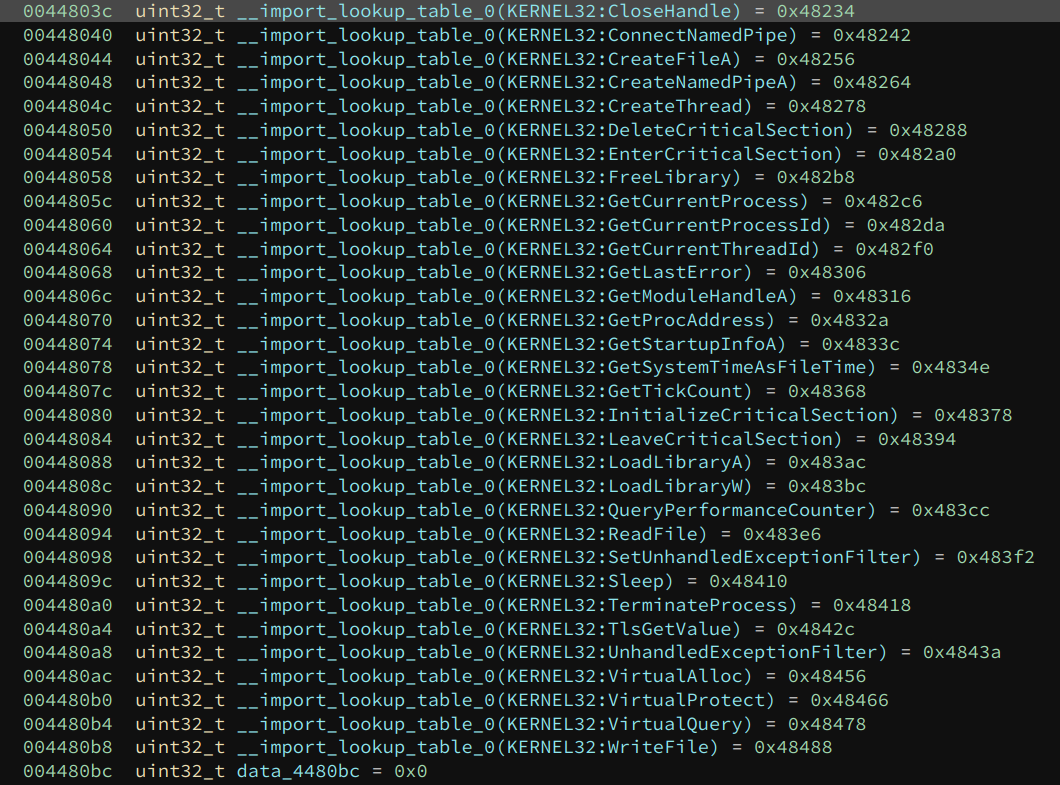
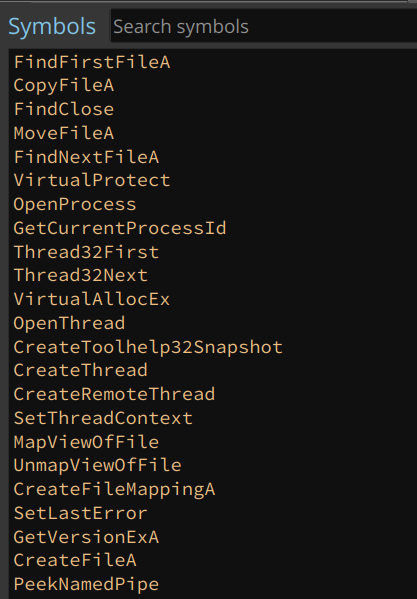
Now, we can load the extracted DLL into Binary Ninja and analyze it. We can see all the Windows APIs it imports.
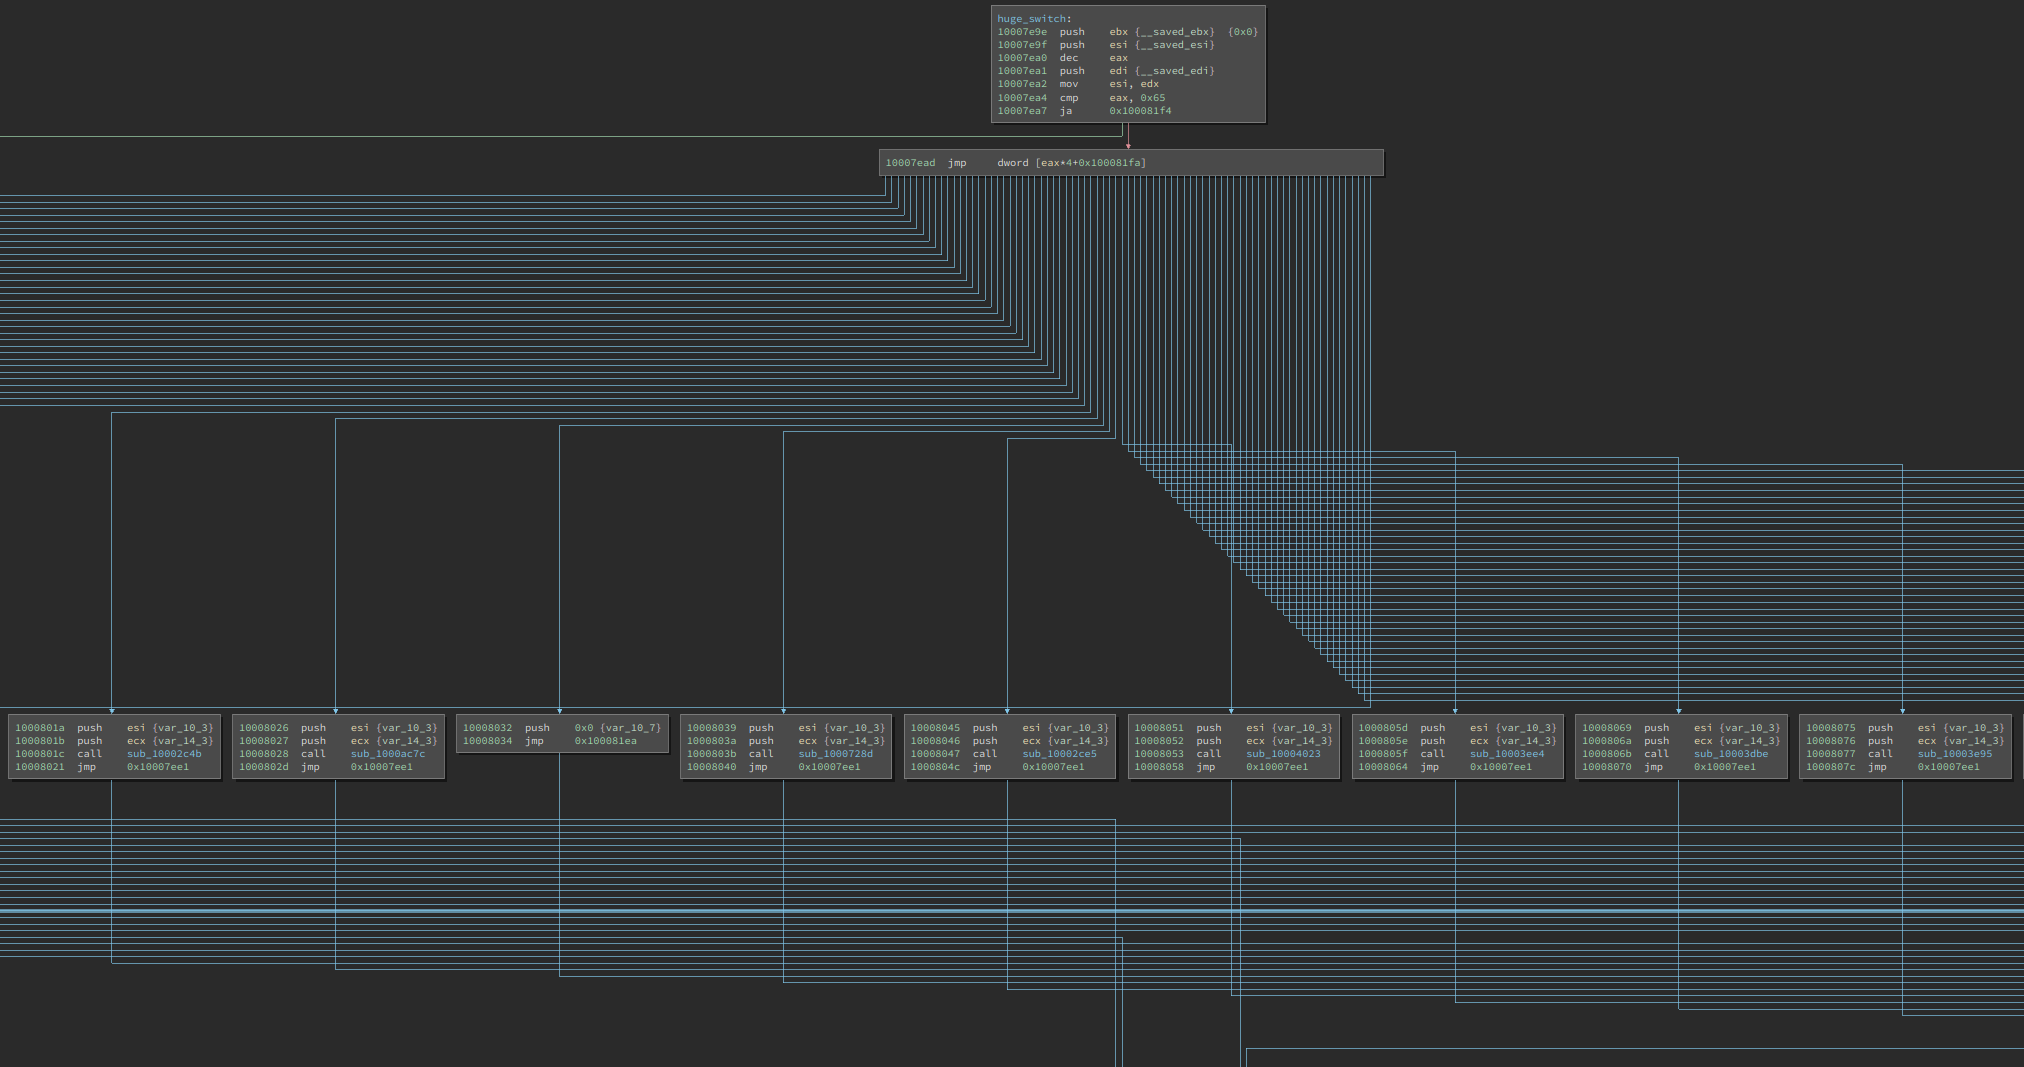
There is a giant switch statement in it (with 0x65 cases), which handles different commands. Analyzing each of them is beyond the scope of this blog post.
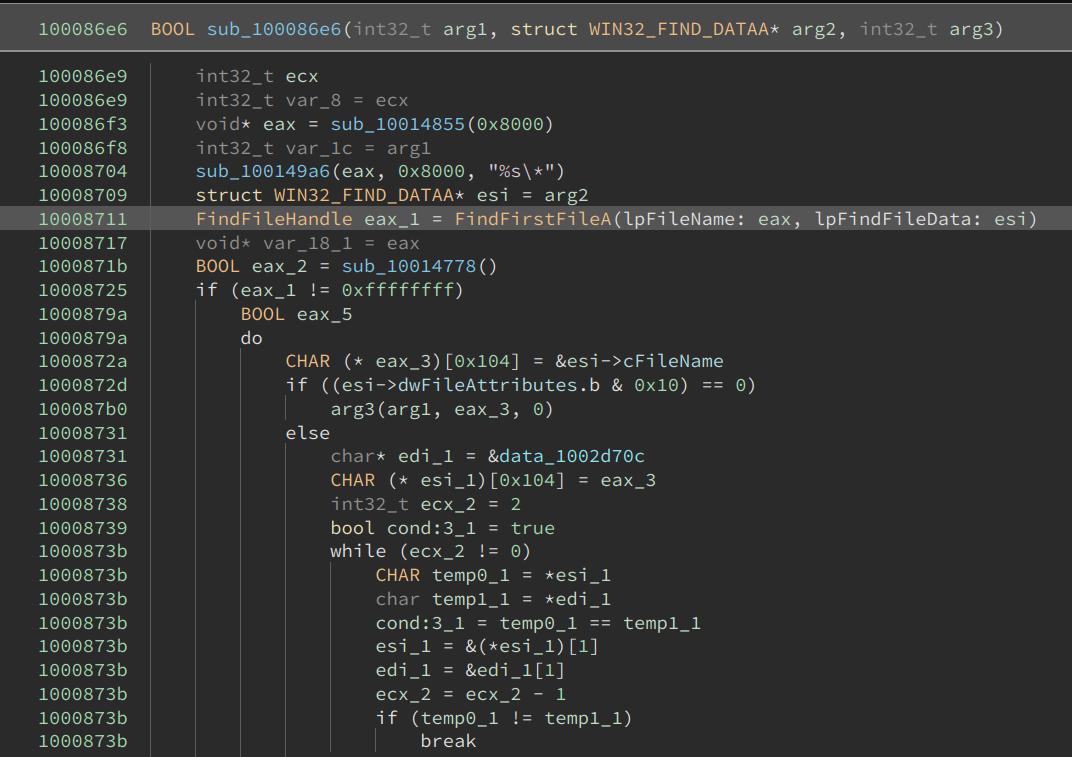
However, since we have fixed the imports, a glance can already give us a good guess at what each might be doing. For example, the following function is likely searching for certain files:
Alright, we have successfully reverse-engineered this Cobalt Strike sample and fixed its payload DLL!