In this blog post, we will take a close look at a Linux binary loaded with various anti-reverse-engineering techniques. The binary is the final boss from the book Programming Linux Anti-Reversing Techniques by Jacob Baines. I will also take this opportunity to show off some Binary Ninja tricks that can speed up your daily analysis!
In this walkthrough, you will learn how to:
- Handle malformed ELF headers and segment tricks
- Work with encrypted and obfuscated code (XOR and RC4)
- Navigate Binary Ninja’s segment and section editing capabilities
- Use powerful selection and transformation features
- Understand the design decisions behind Binary Ninja’s analysis heuristics
- Apply practical workflows for analyzing real-world malware and CTF challenges
Let’s Get Into “Trouble”
The Linux anti-RE book “teaches the reader how to code and analyze well known anti-reversing techniques for Linux”. I particularly like the coding part because it gives the reader hands-on experience with the techniques discussed in the book. It is a classic read but still relevant today. It covers many interesting techniques and is definitely worth checking out.
As a Binary Ninja developer, I can’t wait to see how our tool reacts to these tricks! Conveniently, at the end of the book, the author
created a binary that combines the techniques discussed throughout the book. It is called trouble and can be found on
VirusTotal,
MalShare, or
GitHub.
The author also shared the source code of the binary and the build script. As the README says, it is a password-protected bind shell. The task is to analyze the binary and find out the password, which would grant you access to the shell.
(The code was written in 2016 – if you wish to build it yourself, be prepared for some rough edges!)
Let us see how much trouble it causes!
First Obstacles: Malformed ELF Headers
The binary is an ELF and only 27KB in size, but it immediately looks unusual after we open it. We can see two entries in the Log window:
[BinaryView.ElfView] ELF endianness automatically overridden to little-endian for x86/x86_64 (header specified big-endian)
[BinaryView.ElfView] Section 2 has a size (0xfffffffffffffff6) larger than file size (0x68eb), skipping creation
The first line is a classic technique to defeat RE tools, though it has become a bit too popular in CTF challenges to be particularly novel anymore. The ELF header contains an encoding field that reports the binary’s endianness. This byte can be altered so that the binary will be interpreted with the wrong endianness, causing parsing to fail. However, the program will still execute just fine because the Linux kernel does not reply on this field.
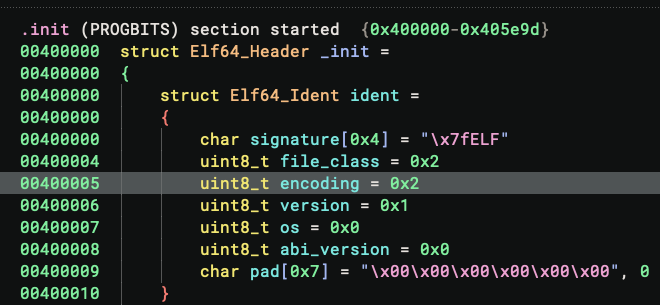
On recent Binary Ninja builds (>= 5.3.8794), this is defeated automatically since the ELF parser recognizes this is an x86/x64 binary and must therefore be little-endian, despite the header reporting big-endian. This behavior is controlled by the setting files.elf.overrideX86Endianness, which is enabled by default. If you are using an older build, you simply need to patch the 5th byte of the binary and change its value to 0x1.
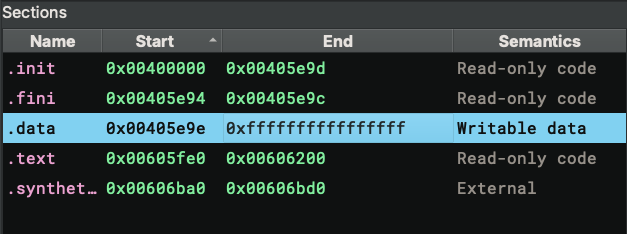
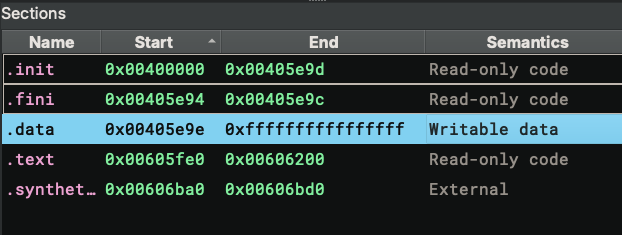
The second log message defeats an attempt to cause chaos by faking a huge section. As we can see from the memory map, the .data section is abnormally large, which could exhaust RAM if we blindly created a buffer to represent it. Luckily, it does not work because the section is larger than the binary itself. This heuristic has worked better than having an arbitrary value as the maximally allowed section size.
Even with all these (and potentially more!) tricks defeated, the code still does not make sense. The UI navigates to
the _init function by default, and the HLIL is odd:
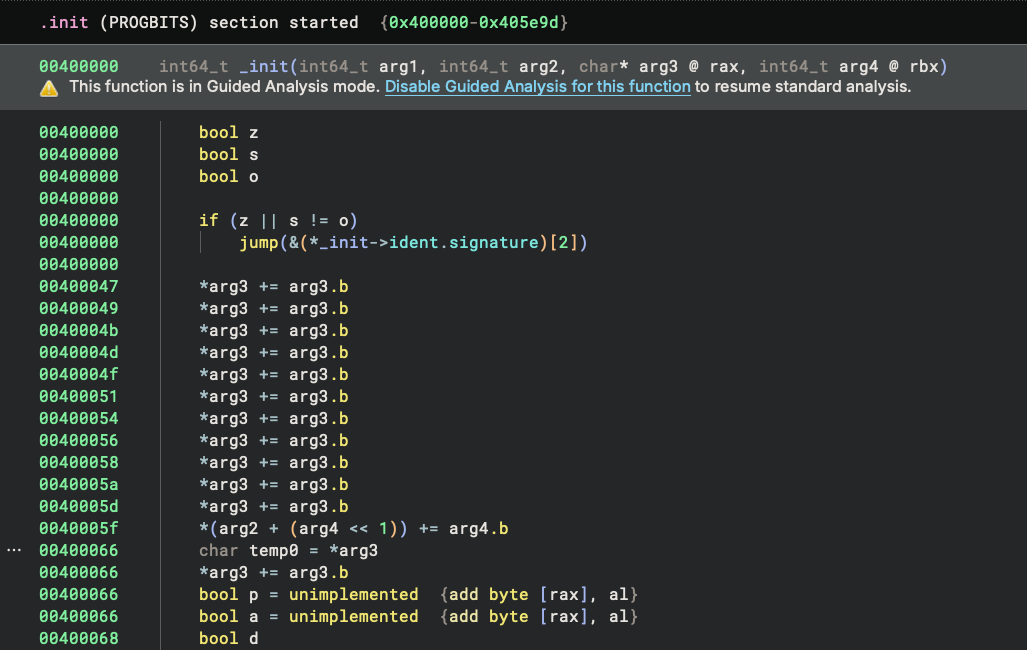
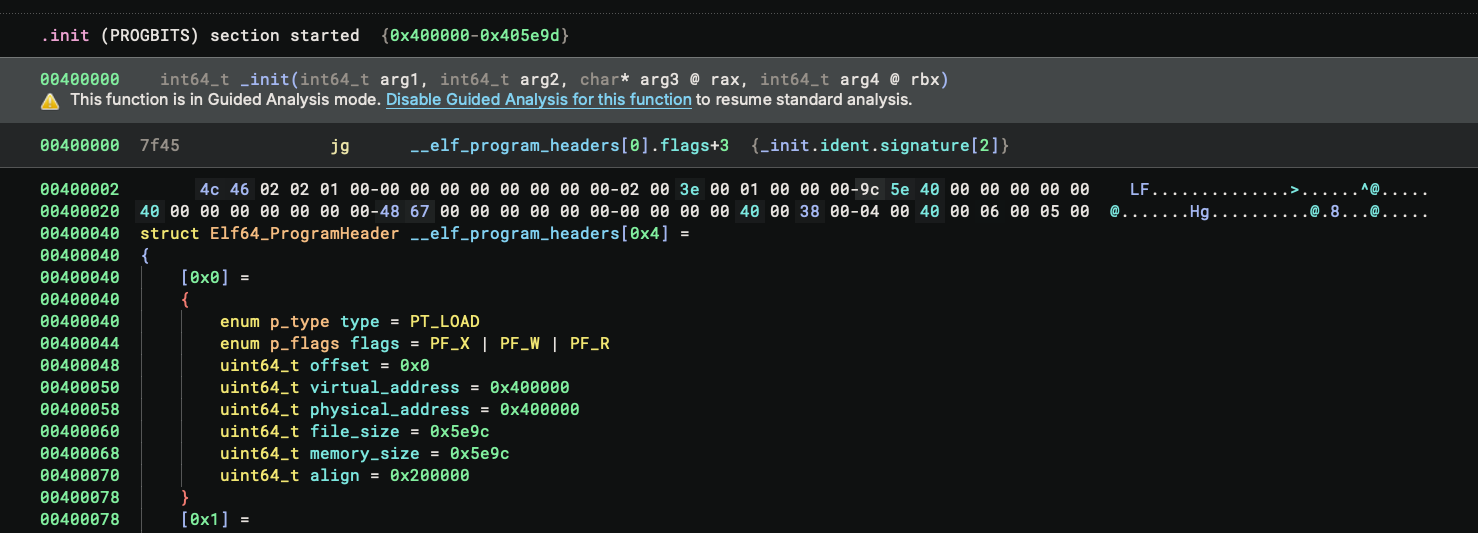
Dropping to the disassembly and noting the address of the function, we can see it starts at the 1st byte of the ELF header – no wonder the code does not make sense! This turns out to be another anti-RE technique: the binary reports a fake init function at the start of the ELF. We simply need to press U to undefine it.
Hidden Code: The Segment Gap Trick
Note that we still do not have any reasonable code to read yet! For cases like this, starting from the _start function is always a good idea since it will be the first instruction the binary executes. I double-clicked on the _start symbol from the symbols view, but the UI navigated to the middle of nowhere:
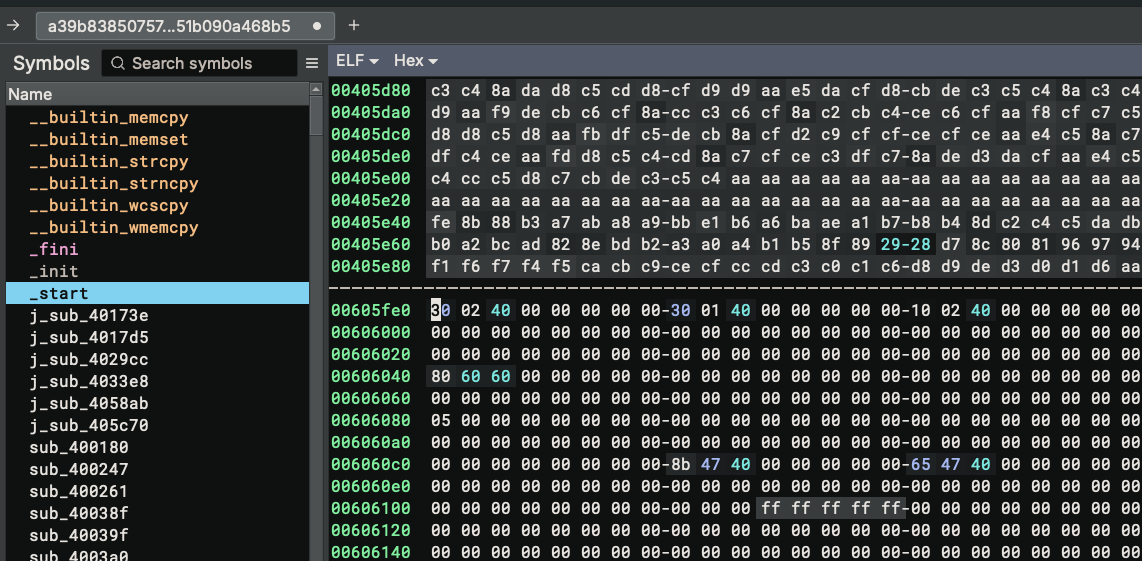
I thought it was a glitch and repeated the operation, but still got the same behavior. I had a closer look at the symbol and started to understand what was going on:
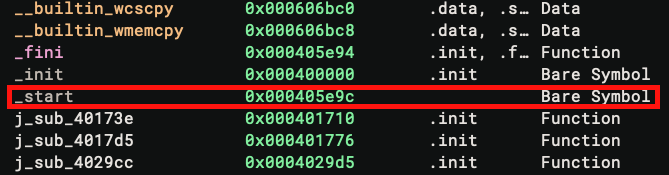
The _start symbol is displayed with a lighter color because it is a bare symbol, and most importantly, its address
0x405e9c is not a valid address! Comparing it with the Segments in the Memory Map widget, we can see the segment
ends exactly at 0x405e9c, cutting the bytes at the _start off.
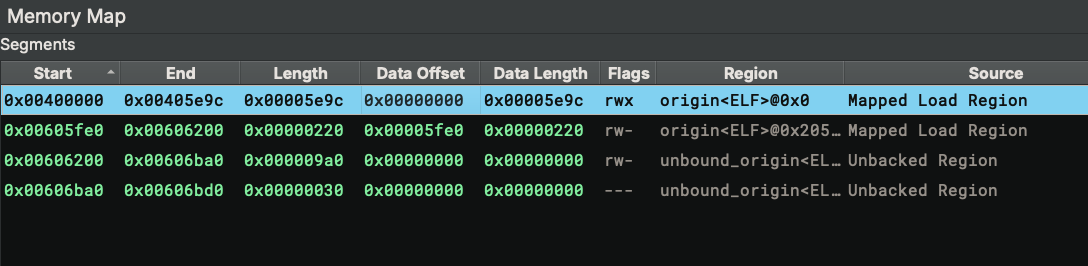
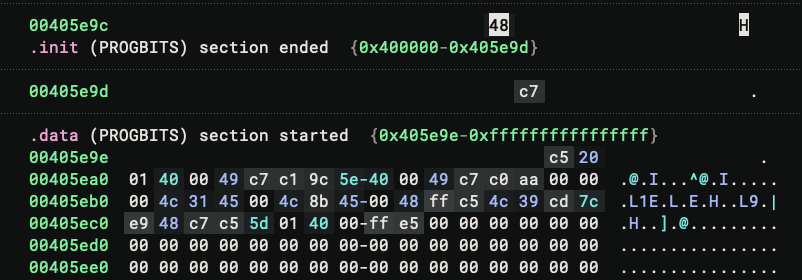
This is another technique commonly used in malware and CTF challenges. Let’s check how the segments are mapped. For the first segment, its data offset starts at 0x0 and ends at 0x5e9c. This means the segment’s content is loaded from bytes 0x0-0x5e9c of the ELF file. For the second segment, it consumes bytes 0x5fe0-0x6200. The bytes 0x5e9c-0x5fe0 are not used. We can check their contents from the Raw view, and they look like valid instructions:
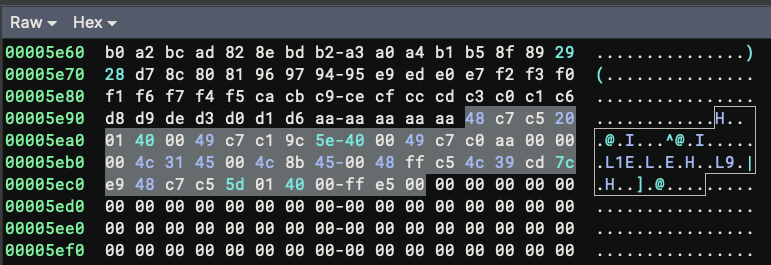
The binary is abusing the fact that when the OS loads the binary, it always does so at a page boundary, which is usually 4KB. So the bytes between 0x5e9c-0x5fe0 get mapped for free even though they are not technically in the range specified by the segment boundary. This makes the program execute just fine even though it looks malformed in Binary Ninja.
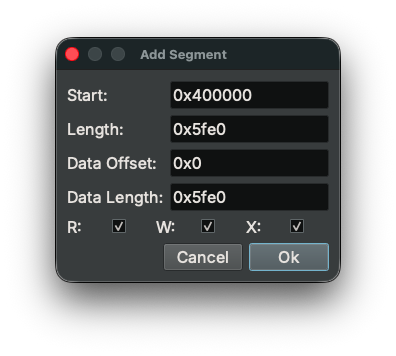
There are a couple of ways to fix it, but the easiest is to just add a new segment with the correct range:
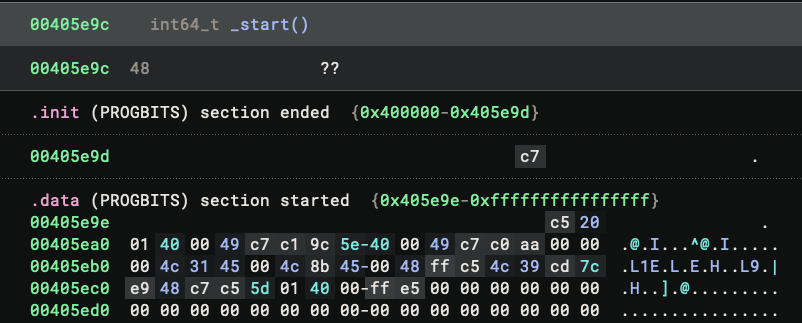
Now we can navigate to _start and we can see the bytes are correct:
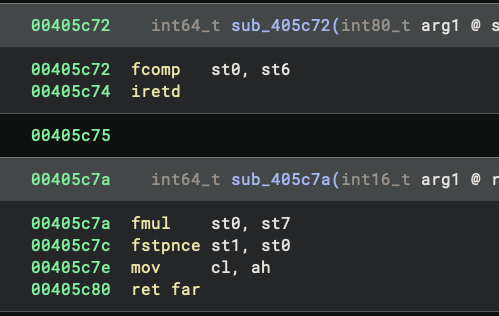
There is no function at the address, probably due to the segment size issue. We can fix it by pressing P to create a function. And the binary never stops surprising me – instead of valid disassembly text, the function shows up as ??
I was confused for a moment. I confirmed that the bytes themselves are valid – I can put them in an empty view and disassemble them properly. There must be something else going on.
Understanding Binary Ninja’s Analysis Heuristics
It turns out that this is caused by a particular heuristic in Binary Ninja’s disassembler logic. Coincidentally, we happen to have made the default basic blocks analysis code open-source in the stable 5.1 release (in August 2025), and you can now view the exact related lines on GitHub.
(As a note, I also highly recommend the readers to check out this blog to see what they can do now with custom function-level basic block analysis, especially for obfuscated binaries)
As the comment explains, the analysis considers an instruction invalid when it is “straddling a boundary to a section that is non-code, or not backed by file”. When that happens, the basic block analysis reports the instruction as invalid and thus terminates the basic block, even though the architecture plugin says the instruction is valid.
We can verify that the last byte of the instruction does not have code semantics:
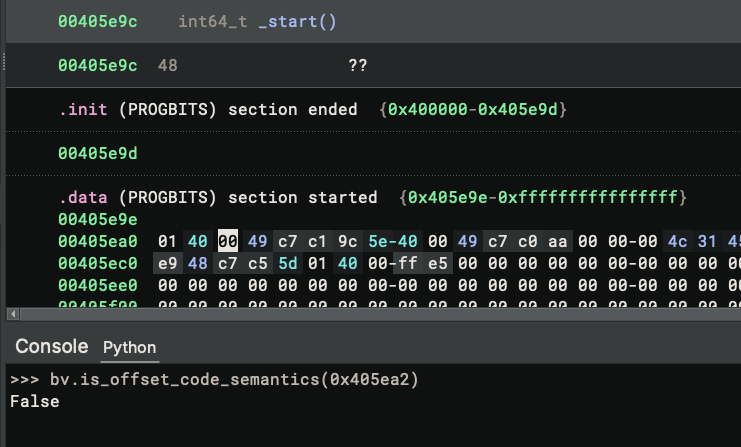
Why is that? Well, the offset belongs to the .data section, and its semantics are Writable data, which does not convey code semantics. An interesting fact here is that Binary Ninja considers both section and segment semantic information, but the section semantic information prevails. As a result, even though the segment we just enlarged covers the byte and has code semantics, the incorrect section semantics are used.
Is this a bug? Not exactly – it’s an engineering trade-off. Since section information does not affect the Linux loader (the segment information is the key), it is possible to lie with the section semantics, and that is exactly what is happening here. But we cannot simply change the code to always use segment semantics and ignore section semantics – in many cases where the binary is not manipulated, the section semantics still provide valuable information that helps produce better output. In other words, this is a perfect example of the dilemma we often face when developing Binary Ninja: one heuristic can work perfectly on a particular sample but break others.
(If you are curious about more cases like this, check out Jordan’s Breaking Decompilers talk at Off-By-One)
What is the middle ground? Well, as suggested in the issue comment, we can offer a setting to ignore section semantics, and have it disabled by default. It might give you the best of two worlds without hurting each other.
This is a nuanced case worth understanding in depth. There is one more thing to explain: why did we have this heuristic to treat an instruction as invalid when it straddles a non-code or section not backed by file in the first place?
The answer is that this heuristic prevents runaway analysis on certain binaries. Imagine you have a giant .bss section whose size is essentially unlimited, with another section right before it. Suppose some bytes at the end of the previous section, combined with a few zero bytes from the .bss section, happen to disassemble to a valid instruction. The disassembler would then continue to disassemble the next instructions in the .bss section. Since zero bytes (00 00 to be precise) disassemble to a valid x64 instruction (add byte [rax], al), the disassembler would end up disassembling ALL the zero bytes in the .bss section, causing runaway analysis and performance issues or out-of-memory errors.
While Guided Analysis provides more flexibility for edge cases like this, the heuristic handles the common case well. Now that we understand the exact dynamics of it, we can work around it.
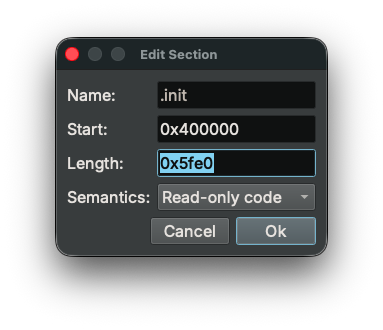
Back to our challenge – to fix the disassembly issue, we simply need to enlarge the .init section – which contains read-only code – to cover the problematic bytes:
And the code now disassembles:
Decrypting Layer 1: XOR Obfuscation
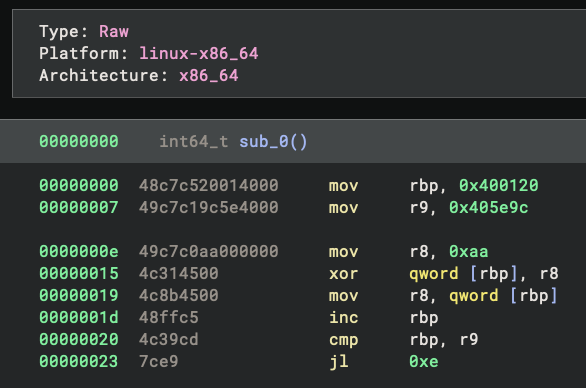
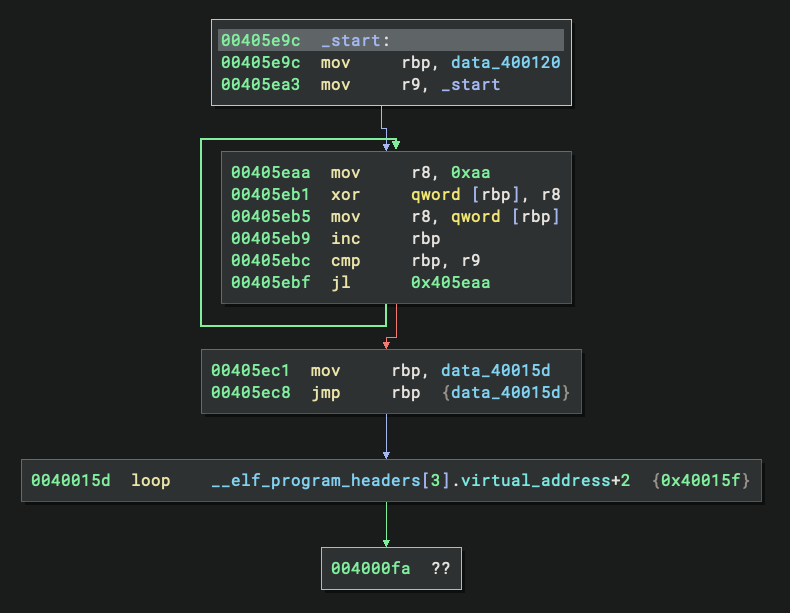
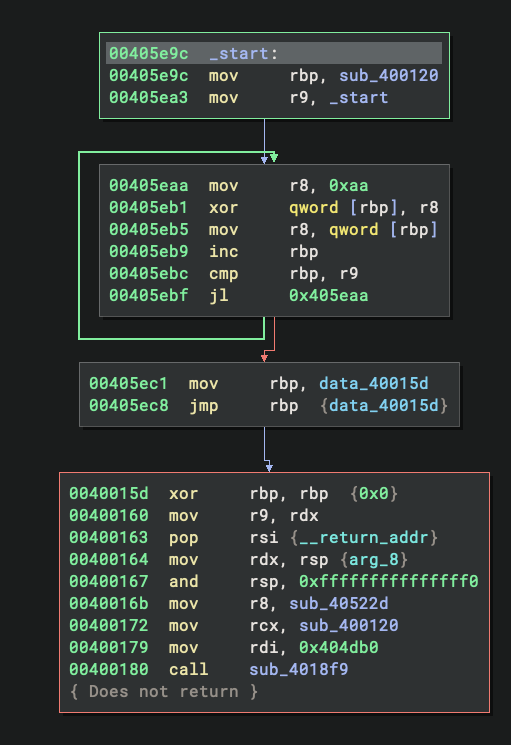
Looking at the disassembled code at _start, we can immediately spot a decryption loop. The code loads the value 0xaa into r8 and uses it to XOR a large buffer starting at address 0x400120 and ending at 0x405e9c. After the XOR operation completes, the code jumps into the middle of this newly-decrypted region. This is a classic self-decrypting code pattern commonly seen in protected binaries.
Before we decrypt the buffer, let’s clean up a bit. While XORing, and other transformations, are one of Binary Ninja’s killer features, a practical annoyance here is that the linear sweep has incorrectly created many functions from the encrypted bytes:
We could just ignore them and proceed with the analysis, but it is a good idea to clean them up first. In linear view, we can press U in a function to undefine it. Better still, we can select a range of bytes and then press U on it, and all the functions and data variables in that range will be undefined – perfect for this case. Make sure the start and end of the selection are not in any function, or it will only undefine that particular function. (As the developer who wrote this feature, I find it extremely useful for cleaning up large ranges.)
Alternatively, you could also do “Open With Options” with the binary, and disable the linear sweep in the settings:
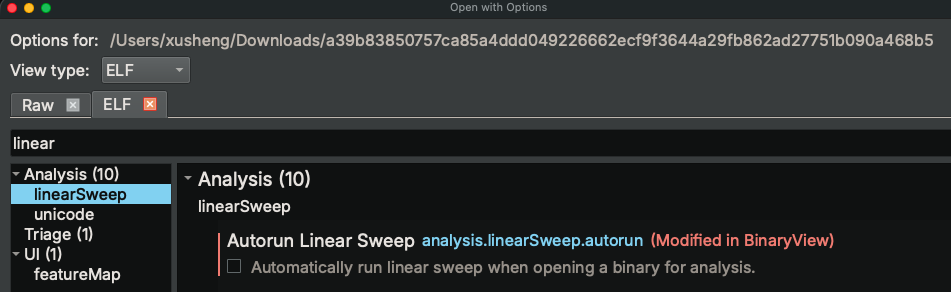
This way, only the functions that are defined by the binary view and called directly will be created, and those bogus ones would not be created.
Another useful tip I want to mention are the shortcuts for making selections. In this case, the buffer that needs XORing is quite large, so dragging to make the selection can be tricky. You could select the first byte, drag the scroll bar to the end, and click the end byte while pressing the shift key – this gives you the selection with just two clicks. Even better, the right-click context menu offers several ways to make selections without any dragging:
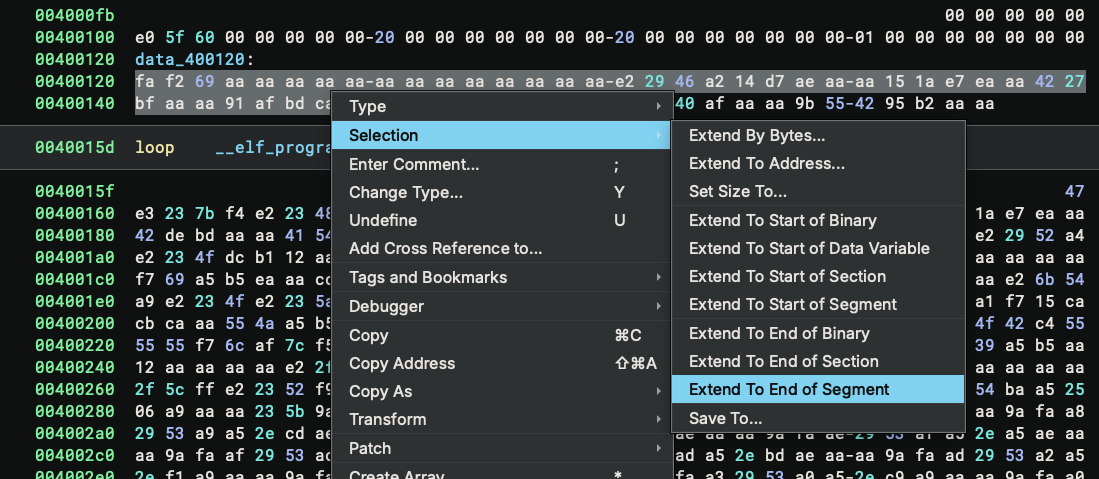
For this case, we can simply select the first byte, then use Selection → Extend To End of Segment to quickly make the selection. Another useful option is Set Size To..., which extends the selection to a particular size – useful when you want to dump a range of bytes and you know its start and size. And don’t forget about Save To... which you can use to save the selection directly.
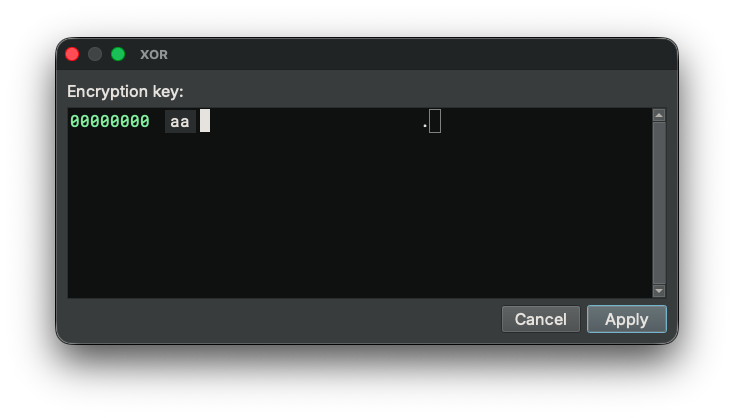
With the selection made, we can proceed to XOR it. I hope you have used the feature before (because it is one of the earliest Binary Ninja features!) – but here is how to find it if you have not:
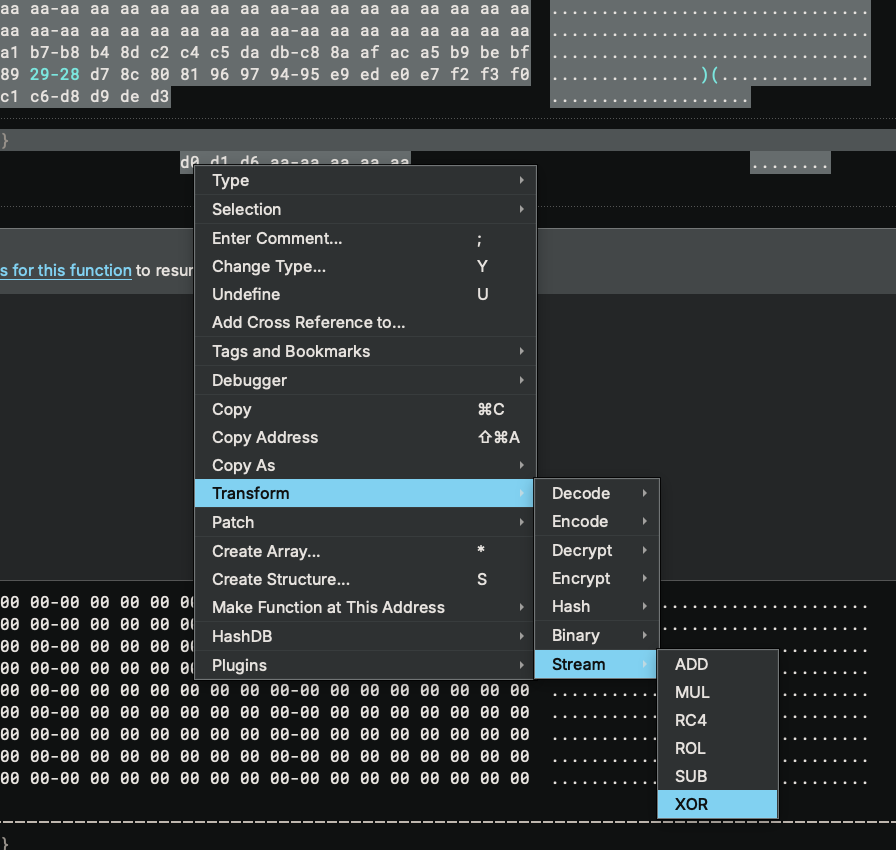
And we just need to type in the XOR key, which is 0xaa:
Once the buffer is decrypted, the code makes sense:
Decrypting Layer 2: Finding the Password
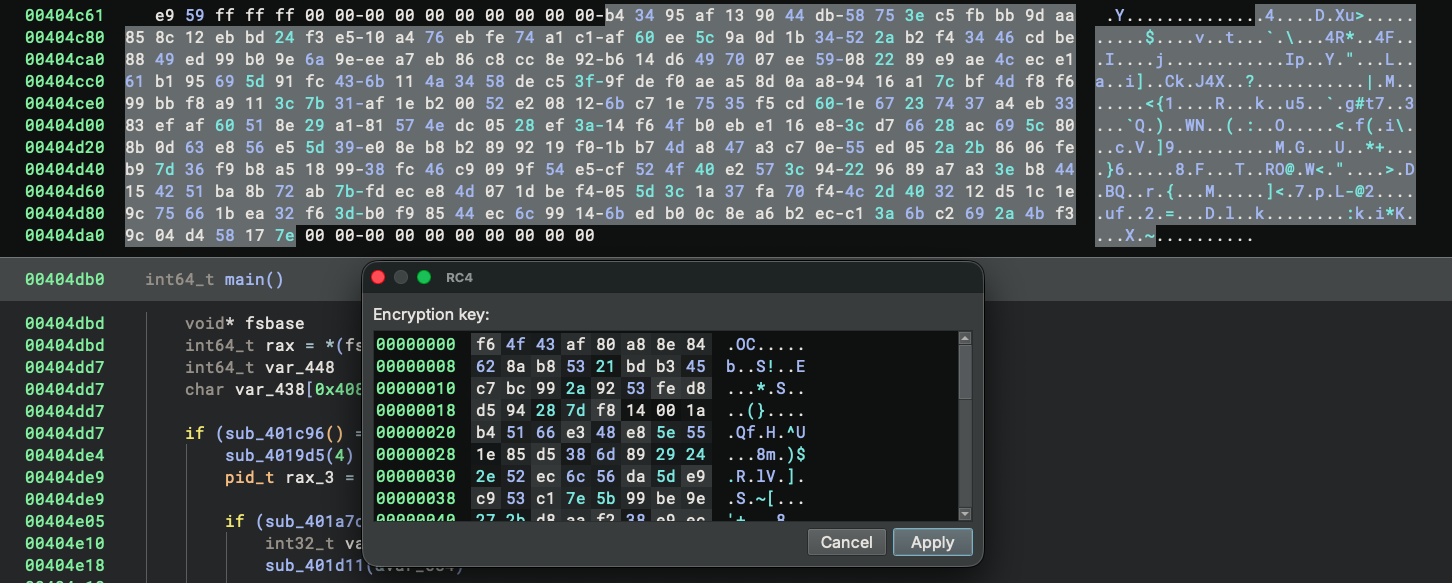
Now that we have the decrypted code at _start, we can follow the execution flow. This is a statically linked binary, so the last call in _start is a call to __libc_start_main. The value of the rdi register, 0x404db0, is the main function. We can double-click 0x404db0 to follow it and press P to create a function there.
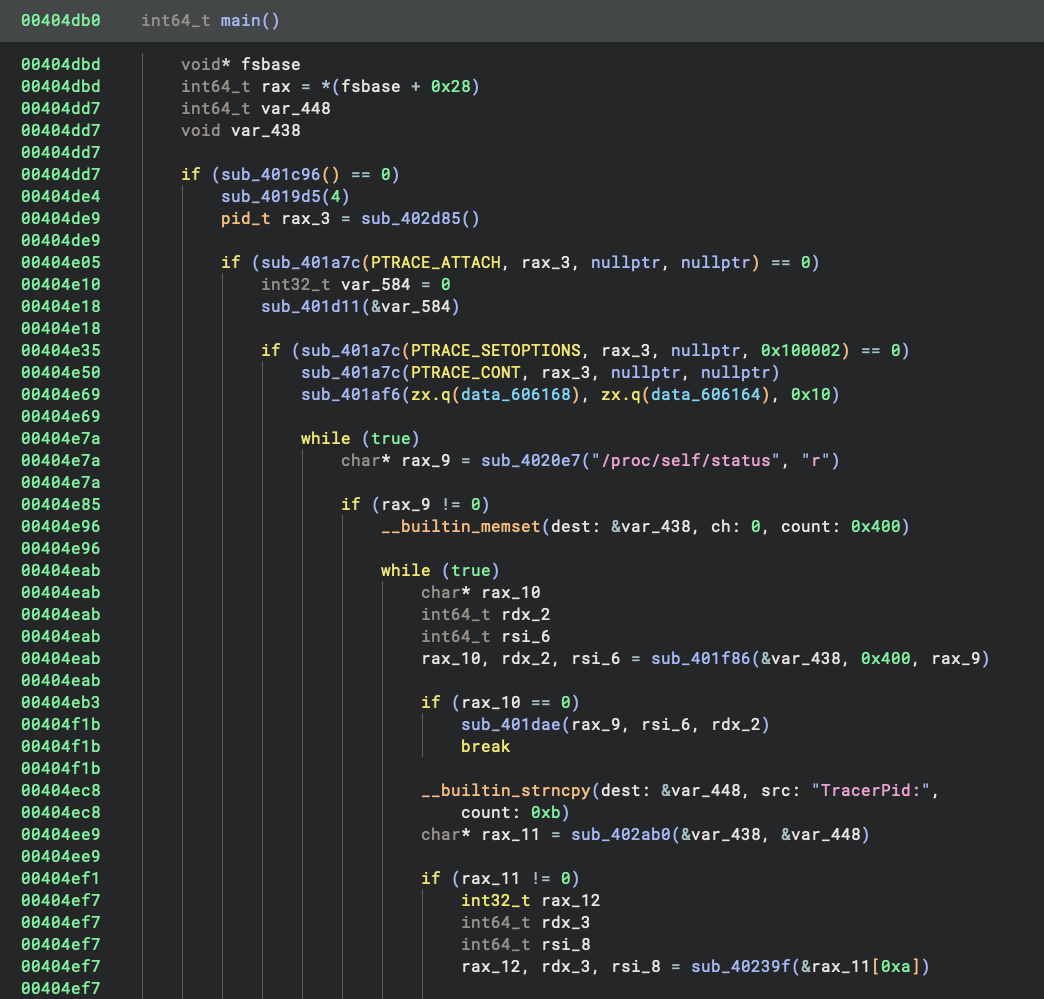
The main function looks pretty normal, and for the first time we can read the decompiled HLIL. While this binary is statically linked and contains a handful of library functions that we do not recognize, we can still quite easily see that it is doing some anti-debugging:
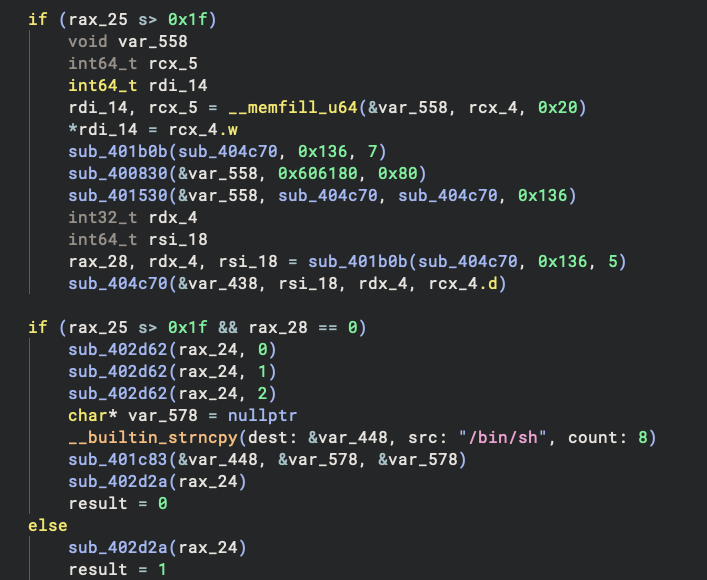
Scrolling down a bit, we can see the normal socket operations followed by a reference to the string /bin/sh. Remember, this is a password-protected bind shell, so this is where it gets interesting.
There is a function sub_401530 that I identified to be RC4. Even if I missed it, our AI assistant,
Sidekick would be able to help me recognize it:
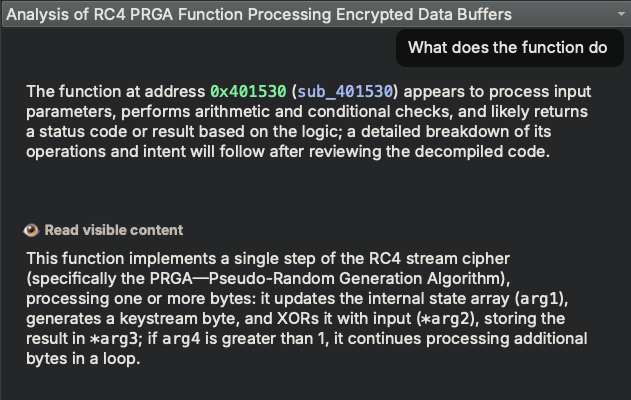
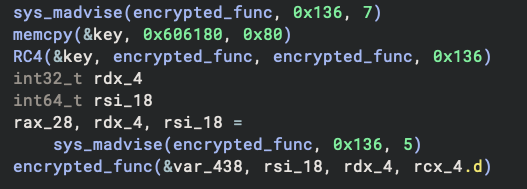
I marked up the code a bit to make it more readable. We can see it’s decrypting another buffer with RC4 before executing it.
If you want to save yourself from the manual analysis, Sidekick can help!
And of course we will decrypt the code using the built-in transformation again:
After we decrypt the bytes, the code looks more reasonable:
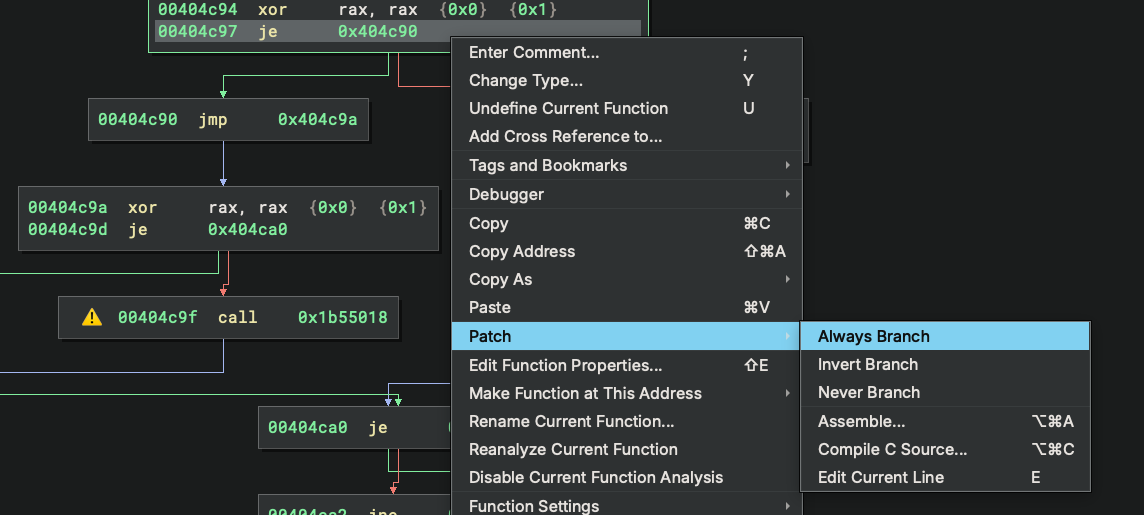
Although the CFG looks non-trivial, we quickly see this is because of the opaque predicates in it. For things like this, we can patch them easily by right-clicking → Patch → Always Branch (or Never Branch):
Or even better – just read the HLIL because the decompiler removed these opaque branches automatically:
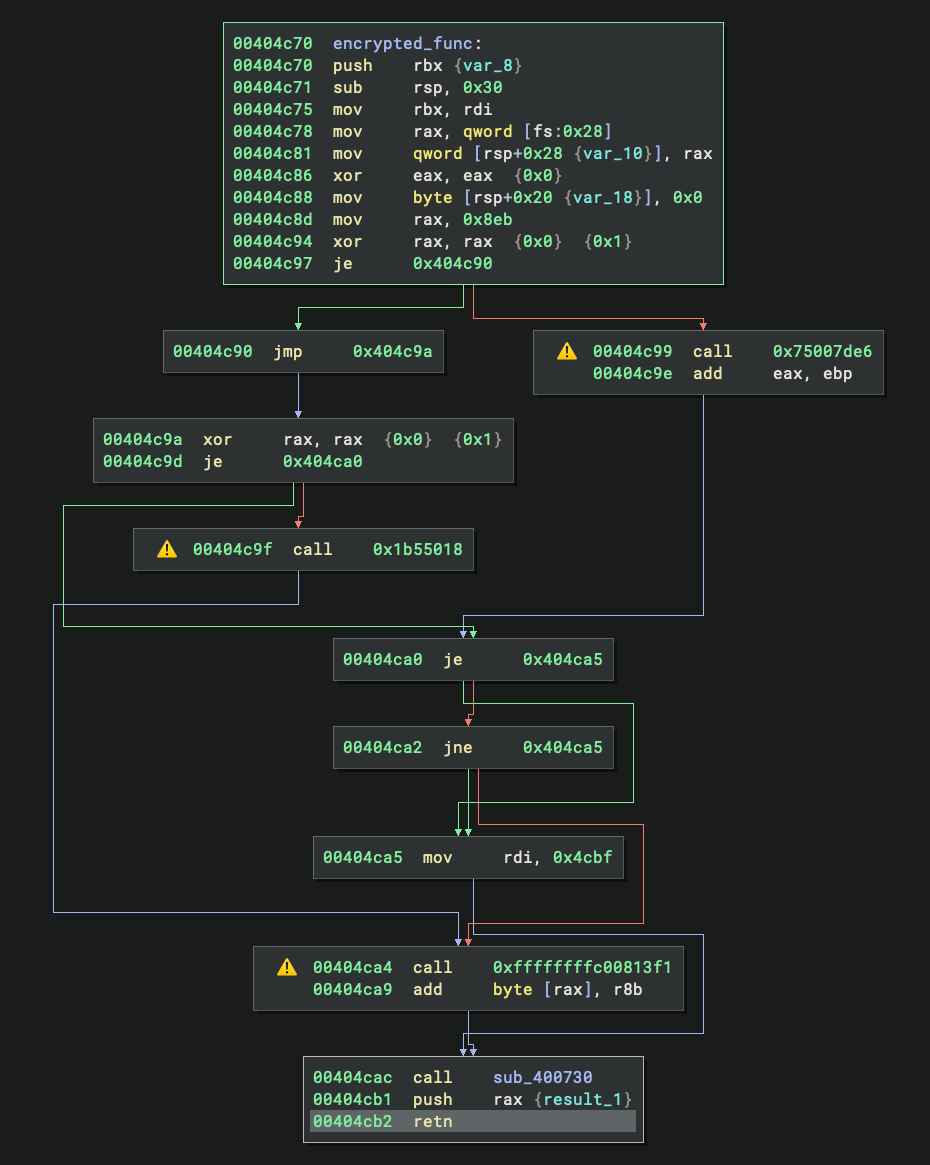
At the end of the function, we see the following disassembly:
00404cac  call    sub_400730
00404cb1  push    rax {result_1}
00404cb2  retn

00400730  sub_400730:
00400730  lea     rax, [rdi+0x400000]
00400737  retn     {__return_addr}
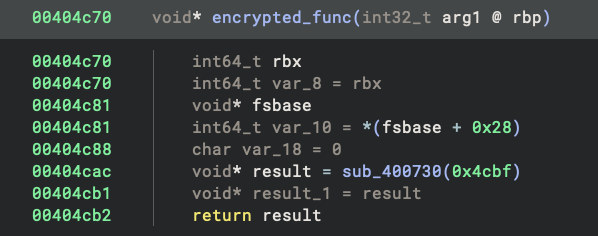
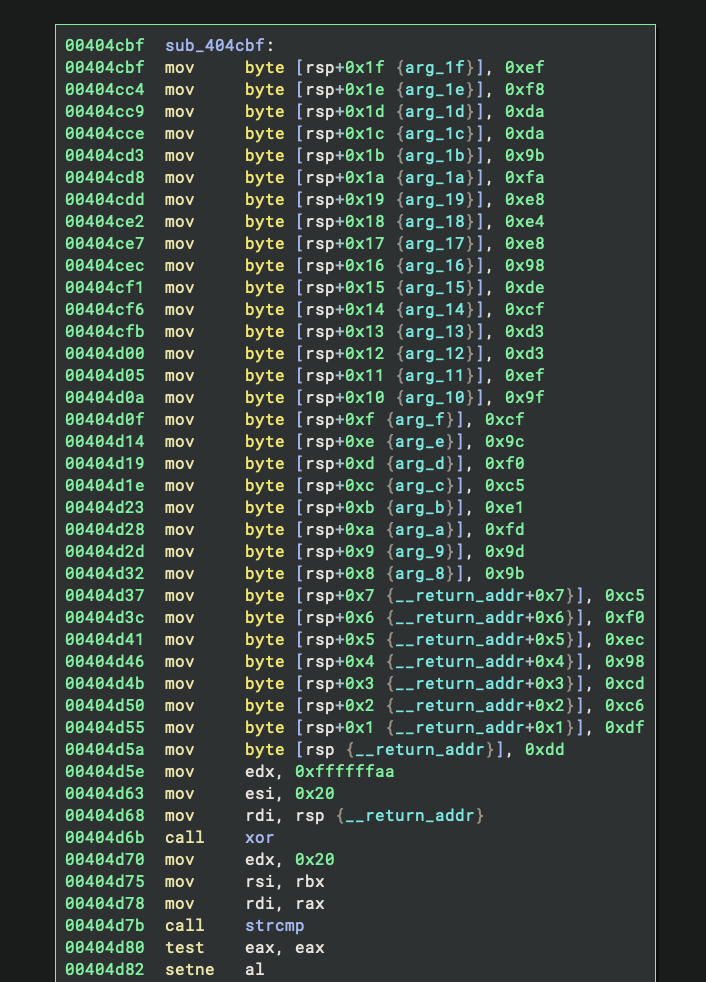
This is simply jumping to rdi+0x400000. Looking at the calling code earlier in the function, we can trace back and see that rdi was set to 0x4cbf, making this an obfuscated jump to 0x404cbf. This function starts with the construction of a stack string:
And thanks to the string outlining feature, it is much nicer to read in the decompiler:
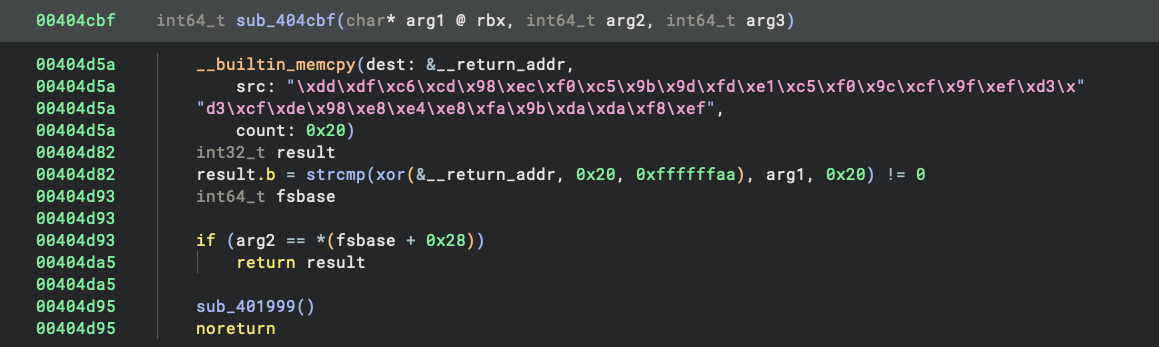
What it does is straightforward: looking at the decompiled code, we can see it XORs each byte of the constructed string with 0xaa and then compares the result with the user input. This gives us the password: wulg2FZo17WKoZ6e5Eyyet2BNBP1ppRE. We can verify this is correct from the compilation log.
Conclusion
And that’s it! We have successfully gotten out of trouble by defeating all of the anti-analysis techniques. This challenge provided an excellent opportunity to showcase Binary Ninja’s capabilities in handling obfuscated and malformed binaries, from automatic endianness detection to powerful transformation features and transparent decompilation.
If you want to try this analysis yourself, the trouble binary is a great learning exercise. Binary Ninja Free is perfect for getting started with reverse engineering challenges like this one. You can download the binary and the fully marked-up analysis database for reference. The techniques and workflows shown here apply to many real-world malware and CTF challenges, making this a valuable hands-on learning experience.
References
Downloads
-
Trouble Binary: GitHub VirusTotal MalShare - Analysis Database: GitHub
- Source Code: dont_panic repository
Binary Ninja Resources
- Binary Ninja Free: binary.ninja/free
- Sidekick AI Assistant: sidekick.binary.ninja
- Guided Analysis: Documentation
- Function-Level Basic Block Analysis: Blog Post
- Default Basic Block Analysis: GitHub
Additional Resources
- Breaking Decompilers Talk (Jordan Wiens): YouTube